
Introduction: Why Build a Home Cheese Aging Cave?
Artisan cheese making is a rewarding and delicious DIY hobby, but the art isn’t complete until your cheeses have matured in the ideal conditions. Aging, or affinage, is a crucial stage that transforms curds into creamy brie, sharp cheddar, or robust blue. Traditionally, cheese caves—humid, cool, stone-lined cellars—provided the perfect environment for this process. Fortunately, you don’t need a medieval cellar to age cheese at home. With the right tools and equipment, you can recreate those conditions in a spare closet, basement corner, or even a repurposed refrigerator. This guide will walk you through every essential item you’ll need to set up a home cheese aging cave, from environmental controls to shelving and sanitation. Whether you’re a home cheesemaker ready to move beyond fresh cheeses or a passionate food lover aiming for perfection, this comprehensive guide will help you master the setup for delicious, consistent results every time.
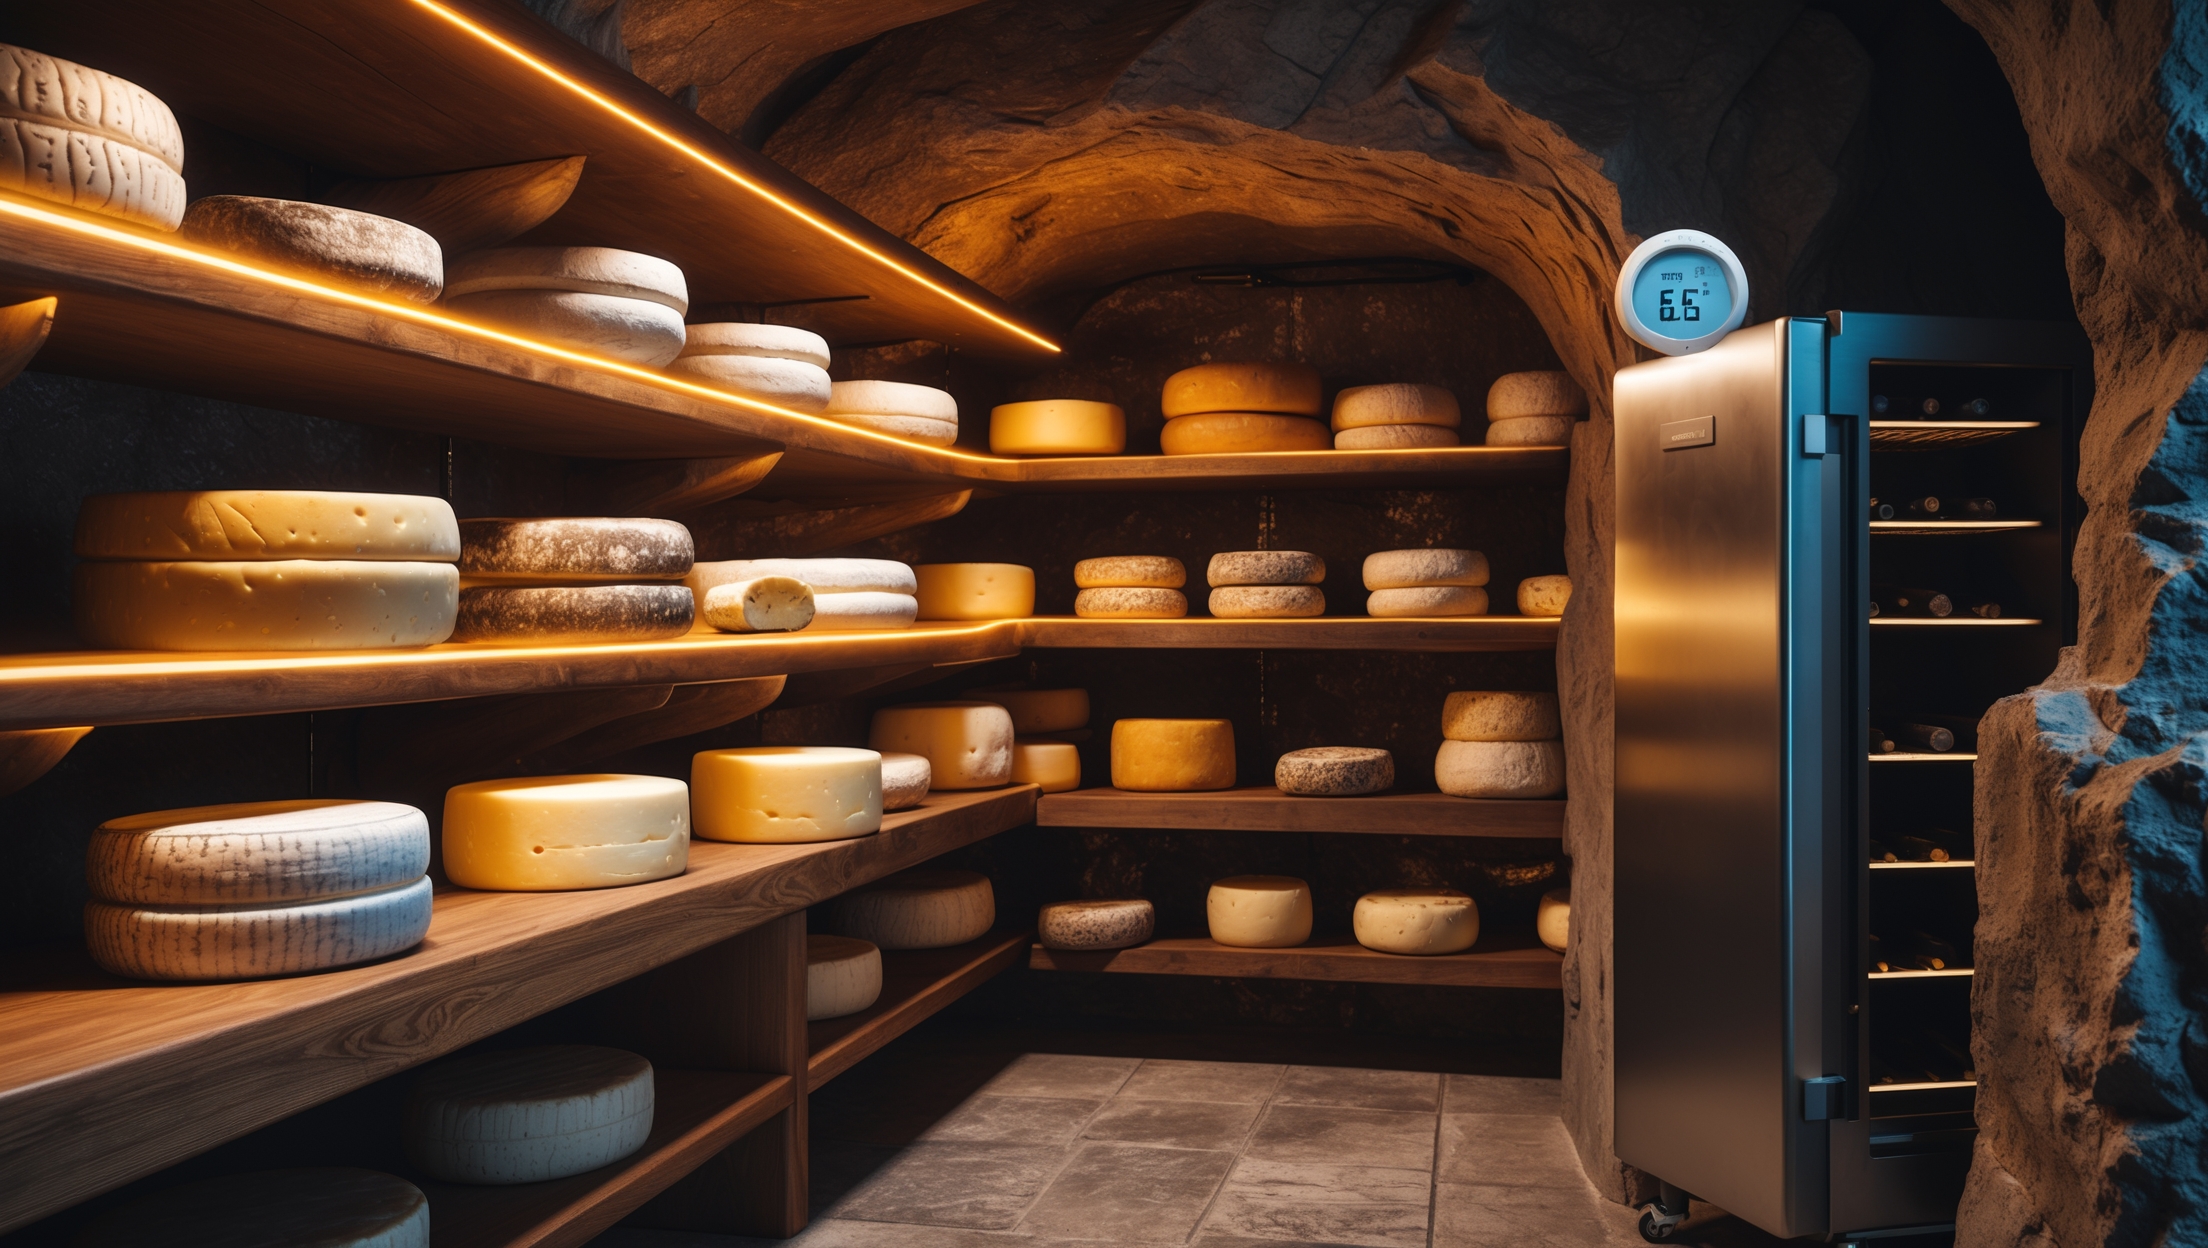
Understanding Cheese Aging Cave Requirements
The Science of Affinage
Different types of cheeses require specific temperature and humidity levels to develop their flavor, texture, and rind. Hard cheeses like cheddar and gouda thrive in slightly lower humidity and cooler temperatures, while soft or washed rind cheeses need warmer, more humid conditions. The right environment encourages beneficial molds and bacteria while deterring spoilage and unwanted growth. Here’s what you’re aiming for:
- Temperature: 50–55°F (10–13°C) for most cheeses
- Humidity: 75–95%, depending on cheese style
- Airflow: Gentle circulation to prevent mold hotspots
Choosing Your Cheese Cave Location
Dedicated Cheese Fridge vs. Repurposed Space
Most home cheesemakers use one of two setups: a dedicated wine fridge or beverage cooler, or a modified spare fridge. If you lack these, a cool basement or closet can work with additional equipment. Weigh your space, budget, and cheese ambitions as you select your location. Here’s a breakdown:
- Wine Fridge: Offers precise temperature control and built-in humidity tolerance. Ideal for beginners and small batches.
- Beverage Cooler: Similar to wine fridges, but often less expensive and with adjustable shelves.
- Spare Refrigerator: Can be retrofitted with external temperature/humidity controls. Roomy, but may require more tinkering.
- Basement/Closet: Natural coolness and darkness; requires portable humidifiers, fans, and careful monitoring.
Essential Environmental Control Tools
Temperature Regulation
Most home refrigerators run too cold for cheese aging. To achieve the ideal range, you’ll need:
- External Temperature Controller: A plug-in thermostat (like an Inkbird or Johnson Controls model) allows you to override a fridge’s built-in thermostat. Simply plug your fridge into the controller, set your desired temperature, and the device will switch the fridge on/off to maintain the set range.
- Wine Fridge with Digital Controls: Many wine coolers allow for precise temperature adjustments within the 45–65°F range. Invest in one with a reliable compressor system for steady results.
Humidity Management
Humidity is vital for preventing cheese from drying out or cracking. Tools include:
- Digital Hygrometer: Essential for accurate, real-time humidity readings. Choose a model with a memory function to track fluctuations.
- Small Ultrasonic Humidifier: For dry environments or refrigerators, a compact ultrasonic humidifier can be placed inside to boost moisture. Set it on a timer or control with a humidity controller.
- Humidity Controller: Like a temperature controller, this device automates the humidifier or dehumidifier based on preset levels.
- Water Trays: Simple, low-cost: shallow pans of distilled water placed inside the cave to increase humidity. Add sponges for more surface area.
- Desiccant Packs or Dehumidifier: For overly damp spaces, food-safe desiccant packs or a mini dehumidifier will help maintain balance.
Airflow and Ventilation
Stagnant air encourages unwanted molds and uneven rind development. Ensure gentle airflow with:
- Mini USB Fan: Low-speed fans circulate air without causing cheeses to dry out. Place them strategically for even coverage.
- Vent Holes: If building a custom cave, incorporate adjustable venting for fresh air exchange.
Shelving and Storage Solutions
Optimal Shelving Materials
The shelves you use influence airflow, moisture, and rind formation. Consider:
- Food-Grade Wooden Shelves: Traditional and effective for hard cheeses. Maple, beech, or spruce are ideal as they absorb excess moisture and encourage beneficial microflora.
- Plastic Cheese Mats: Polypropylene cheese mats are easy to sanitize and allow airflow under the cheese.
- Wire Racks: Stainless steel racks are non-reactive and easy to clean, but may require mats to prevent cheese sticking.
Shelf Arrangement
Space shelves to allow at least 2–3 inches between cheeses and walls. Avoid overcrowding; good air circulation is key. Adjustable shelves are useful for accommodating large wheels or tall rounds.
Cheese Handling and Care Tools
Turning and Brushing Tools
Regular handling is required for even aging and rind development. Stock your cave with:
- Cheese Turners: Food-safe gloves or cheese paddles for flipping large wheels.
- Boar Bristle Brushes: For brushing off excess mold or encouraging natural rinds.
- Soft Cloths: For wiping down cheeses during washing or brining.
Cheese Markers and Logs
Keep track of your cheeses with:
- Non-Toxic Markers: For labeling cheeses and marking dates directly on wax paper or aging mats.
- Cheese Log Notebook: Record batch details, aging dates, environmental readings, and observations for each cheese.
Sanitation and Maintenance Equipment
Cleaning Supplies
Cleanliness is vital to prevent cross-contamination and spoilage. Your toolkit should include:
- Food-Safe Sanitizer: Use Star San, iodophor, or a weak bleach solution for disinfecting shelves, mats, and tools.
- Spray Bottles: For misting sanitizer onto surfaces.
- Reusable Cloths or Paper Towels: For wiping down surfaces as needed.
Mold and Pest Control
- Fine Mesh Covers: For open shelving in non-sealed areas, mesh domes or covers keep pests out while allowing airflow.
- Ant Traps/Bait: Place outside the cave to deter ants or other insects from invading.
- Baking Soda: For odor control in enclosed spaces.
Optional Upgrades for Serious Affineurs
Advanced Monitoring Systems
- WiFi Environmental Sensors: Real-time alerts to your phone if temperature or humidity drift out of range.
- Data Loggers: Track and analyze environmental trends for optimal control over aging conditions.
Specialized Aging Boxes
- Microclimate Cheese Boxes: For brie or blue cheeses, these boxes create a highly humid microenvironment within your main cave.
UV Sterilizer Wand
For the ultra-cautious, a portable UV-C sterilizer can be used to sanitize surfaces and tools quickly, reducing unwanted mold spore populations.
Budgeting for Your Home Cheese Cave Setup
Cost Breakdown
- Wine Fridge/Beverage Cooler: $120–$400
- External Temperature Controller: $35–$60
- Digital Hygrometer: $10–$25
- Mini Humidifier: $20–$50
- Humidity Controller (optional): $35–$60
- Food-Grade Shelving/Racks: $30–$100
- Cheese Mats: $10–$20
- Cleaning Supplies: $20–$40
- Small Fans: $15–$25
- Miscellaneous (brushes, gloves, notebooks): $15–$30
Total Estimated Cost: Ranges from $250 (basic, using a repurposed fridge) to $800+ (with advanced monitoring, new wine fridge, and premium materials). Remember, many tools can be sourced secondhand or improvised for lower costs.
Step-by-Step: Assembling Your Cheese Aging Cave
1. Prepare the Space
- Thoroughly clean and sanitize the interior surfaces.
- Install shelving, mats, and racks for airflow and easy cleaning.
2. Set Up Environmental Controls
- Plug fridge or cooler into the temperature controller; set to 52°F (11°C) as a starting point.
- Set up the digital hygrometer and monitor humidity; add trays, humidifier, or desiccant as needed to stabilize within your cheese’s target range.
- Add a mini fan for gentle airflow, positioning to avoid direct blowing on cheese.
3. Stock and Label Cheeses
- Place cheeses on shelves, spaced apart for air circulation.
- Label each cheese with make date, style, and batch number.
4. Monitor and Adjust
- Check temperature and humidity daily, especially in the first week.
- Adjust controls, refill water trays, or run the humidifier as needed to maintain optimal conditions.
5. Maintenance and Cleaning
- Flip and brush cheeses according to their schedule (usually every 2–7 days).
- Sanitize shelves and mats monthly or if excessive mold appears.
- Keep a log of environmental data and cheese progress.
Common Mistakes to Avoid
- Ignoring Humidity: Too low and cheese cracks; too high and unwanted molds thrive. Always monitor and adjust.
- Overcrowding: Restricts airflow and encourages spoilage. Leave space between cheeses.
- Neglecting Cleaning: Dirty equipment breeds bad molds. Clean regularly.
- Improper Airflow: No fan leads to uneven rinds; too much dries cheese. Use gentle, indirect air movement.
Conclusion: Enjoying the Fruits of Your Affinage
Setting up a home cheese aging cave is more than a technical project—it’s an invitation to explore a centuries-old craft in your own kitchen or basement. With careful attention to temperature, humidity, airflow, and sanitation, you can create the perfect environment for transforming simple curds into complex, characterful cheeses. The process might seem daunting at first, but each tool and piece of equipment covered here has a clear purpose and pays dividends in the quality, consistency, and safety of your finished cheeses. As you gain experience, you’ll learn the subtle adjustments needed for different cheese styles and your local climate. The result? A parade of homemade wheels and rounds, each bursting with unique flavor and proudly matured under your roof. Don’t be afraid to experiment, keep detailed records, and share your successes (and lessons learned) with fellow enthusiasts. With patience and the proper setup, your home cheese cave will become a source of endless culinary adventure and satisfaction. Happy aging!
How do you manage the airflow in a small homemade cheese cave? I’m worried about mold growing in certain spots, so are there any simple solutions to ensure even air circulation, especially if I’m using a regular fridge?
Ensuring even airflow is important for consistent cheese aging. In a regular fridge, you can use a small battery-operated fan or a USB fan on a low setting to gently circulate the air. Try not to aim the fan directly at the cheese. Also, rearrange your cheeses regularly and avoid overcrowding to help air move freely and prevent mold buildup in certain areas.
If I use a regular spare refrigerator as my cheese aging cave, how do I control both temperature and humidity accurately enough for soft cheeses that need higher moisture levels?
To control temperature, use an external thermostat to keep your fridge at the ideal range (usually 50–55°F). For humidity, add a hygrometer to monitor levels. Place a tray of water or damp sponges inside to raise humidity, and adjust airflow as needed. For soft cheeses, aim for 80–95% humidity and check both readings regularly to maintain the right environment.
For someone just starting out on a tight budget, is it better to invest in a used wine fridge or try converting an old closet with some equipment? What are the main pros and cons of each setup in your experience?
A used wine fridge is usually simpler to manage, as it maintains stable temperature and humidity with less effort. However, it could be pricier upfront. Converting a closet is more budget-friendly, but requires DIY modifications and regular monitoring. If convenience is key, try the wine fridge. If you enjoy tinkering and saving money, the closet conversion can work well.
Is it possible to set up a reliable cheese cave in an apartment closet if I don’t have access to a basement or spare fridge, and what budget-friendly tools would you recommend for beginners in that scenario?
Yes, you can set up a functional cheese aging space in an apartment closet. Start with a small wine fridge or beverage cooler, which lets you control temperature and humidity better than a standard closet. Use an affordable hygrometer/thermometer to monitor conditions, and add a small bowl of water or a damp sponge to boost humidity if needed. Wire racks or plastic mats will help with air circulation around your cheeses.
For someone on a budget, what would be the bare minimum investment required to transform a standard closet into a functional cheese aging cave with proper environmental controls?
To convert a standard closet into a basic cheese aging cave on a budget, you’ll need a small temperature and humidity controller, a compact fridge or wine cooler (if your closet isn’t cool enough), a hygrometer, and some shelving. Expect to spend around $100–$200 if you shop carefully and repurpose items where possible.
If I’m using a regular fridge instead of a wine fridge or cooler, how can I control the humidity so it stays high enough for proper cheese aging?
To maintain higher humidity in a standard fridge, you can place a shallow pan or tray of water inside to increase moisture. Adding a small fan can help circulate air. Using a hygrometer will let you monitor humidity, and you can adjust by adding or removing water as needed. Wrapping cheese in breathable paper or storing it in a covered container also helps retain moisture.
I’m wondering, if I want to age both hard and soft cheeses at the same time, what’s the best way to manage different humidity and temperature needs in a single home cheese cave?
Aging hard and soft cheeses together in one cave is tricky because they often need different humidity and temperature. The best approach is to use separate containers or boxes within your cheese cave, each with its own humidity control (like a damp towel for soft cheeses). Place them on different shelves if possible, and monitor conditions regularly to keep both types happy.
I noticed you mentioned different humidity needs for hard and soft cheeses. If I only have one aging space, is there a way to safely age both types at once, or should I stick to one style per setup?
Aging both hard and soft cheeses in a single space is possible, but it can be tricky since they thrive at different humidity levels. If you must use one setup, aim for a middle-ground humidity (around 75–80%) and monitor closely. You might also keep the cheeses separated in containers or boxes within the cave to help control microclimates. For best results, though, focusing on one style at a time is safest.
If I want to age both hard cheeses like cheddar and soft cheeses like brie in the same home cave, what would be the best way to manage the different humidity and temperature needs?
Aging hard and soft cheeses together can be tricky since they require different humidity and temperature levels. The best approach is to use separate containers or boxes within your main cave. For example, store brie in a sealed box with a damp paper towel to maintain higher humidity, while cheddar can stay on open shelves. Adjust the overall cave temperature to a compromise—around 50–55°F—and monitor each box’s conditions with hygrometers and thermometers for best results.
If I set up my cheese aging cave in a basement corner, how often should I be checking and adjusting the environment to make sure it stays consistent, especially with the seasons changing?
When aging cheese in a basement corner, it’s best to check temperature and humidity at least once daily. As seasons change, fluctuations are common, so monitor more closely during those transitions. Make small adjustments as soon as you notice readings drifting out of your target range to keep conditions stable.
How much of a difference does gentle airflow really make in preventing mold hotspots? If I’m short on space, could I just skip the fan or is that asking for trouble?
Gentle airflow plays a big role in keeping humidity even and preventing mold from concentrating in certain areas, which can lead to spoilage. Skipping the fan can work for small batches, but you’ll need to monitor and rotate your cheeses frequently to avoid mold hotspots. If you notice persistent issues, adding a small fan is worth considering.
For someone just starting out, how much should I expect to budget for the essential environmental controls mentioned, and are there any cost-effective alternatives for beginners?
For beginners, setting up basic environmental controls like temperature and humidity can cost between $100 and $300. You can use a small fridge with an external temperature controller and a simple digital hygrometer. Some people use damp sponges or small humidifiers for humidity control, which are very affordable alternatives to specialized cheese cave equipment.
For someone new to affinage who only wants to age small batches of cheese, what’s the most budget-friendly equipment you would recommend to set up a safe and effective cheese cave at home?
For small batches, a mini or dorm-size fridge is a cost-effective base for your cheese cave. Add a digital temperature and humidity controller to maintain ideal conditions. Use a shallow tray of water or a small humidifier for humidity, and place a thermometer and hygrometer inside to monitor the environment.
If I wanted to age both hard cheeses like cheddar and soft cheeses like brie, is it possible to do so in the same cave, or do their different temperature and humidity needs require completely separate setups?
Aging hard cheeses like cheddar and soft cheeses like brie together in the same cave is possible, but it can be tricky because they have different ideal temperature and humidity requirements. You risk compromising the quality or safety of one or both types if you don’t carefully control conditions. If you only have one cave, try aging similar cheeses at the same time or use airtight containers to create microclimates for each cheese type, adjusting humidity locally where needed.
The article mentions different temperature and humidity needs for hard versus soft cheeses. Is it possible to age both types in the same setup, or do I need separate caves for each?
It can be tricky to age both hard and soft cheeses in the same setup because they typically require different temperature and humidity levels. Soft cheeses generally need higher humidity and slightly lower temperatures than hard cheeses. If your setup allows you to fine-tune separate zones, you might manage both, but for the best results, separate caves or dedicated spaces are recommended.
I’m curious about the ongoing maintenance involved with a home cheese cave setup—how often do you need to clean or adjust the environment once the cheeses start aging?
Ongoing maintenance for a home cheese cave involves regular monitoring of temperature and humidity—ideally checking them daily. Cleaning should be done every few weeks to prevent mold and bacteria buildup, and any spills or visible mold should be addressed right away. You may also need to adjust the settings on your temperature or humidity devices as the seasons change or if you notice fluctuations.
How much of an initial investment should I expect if starting with just a regular fridge and no existing equipment? Are there budget-friendly ways to achieve reliable airflow and humidity without buying a wine fridge?
If you start with a regular fridge, you can expect an initial investment of around $60–$150. This covers a digital temperature controller, a small fan for airflow, and a basic humidity controller or hygrometer plus a humidifier or damp sponge setup. These DIY solutions are much more budget-friendly than a wine fridge and work well for beginners.
If I want to age both hard cheeses like cheddar and softer ones like brie at home, do I need separate caves for each style, or is there a way to safely create zones with different humidity and temperature in one fridge?
You don’t necessarily need separate caves, but hard and soft cheeses do prefer different humidity and temperature levels. You can use a single fridge by creating zones—use containers or boxes with tight lids to maintain higher humidity for soft cheeses, while leaving hard cheeses on open racks. Just monitor each zone with its own thermometer and humidity gauge for best results.
You mention using a wine fridge or a repurposed refrigerator for the cheese cave—are there specific models or features I should look for to help control humidity effectively, especially if I’m on a budget?
When selecting a wine fridge or repurposed refrigerator for cheese aging, look for models with adjustable temperature controls and enough space for airflow. Humidity control is crucial, so choose units that can accommodate a small humidifier or a tray of water. Budget-friendly options often lack built-in humidity controls, but you can add a digital hygrometer to monitor levels and adjust as needed.
For someone just starting out with affinage on a tight budget, would you recommend prioritizing a wine fridge over retrofitting a closet space, or have you found the results to be similar if you monitor temperature and humidity closely?
If you’re on a tight budget, retrofitting a closet can work well as long as you consistently monitor and control temperature and humidity. A wine fridge is more convenient and stable but can be pricier. Both options can yield good results if conditions are carefully managed, so choose based on your space and resources.
You mention using a cool basement or closet if a wine or beverage fridge isn’t available. What kind of environmental controls or devices would you recommend for those less insulated spots to keep temperatures steady enough for cheddar or gouda?
For a basement or closet, consider using a digital temperature controller paired with a small fridge or cooling unit to regulate temperature. A hygrometer can help you monitor humidity, and a humidifier or tray of water can maintain ideal moisture. Insulating the space with foam panels can also help stabilize conditions for aging cheeses like cheddar or gouda.
I’m on a tight budget—are there any affordable alternatives to commercial shelving that still allow for good airflow and sanitation inside a DIY cheese cave setup?
Absolutely, you can use wire cooling racks or stackable plastic crates as affordable shelving options. Both allow good airflow around your cheeses and are easy to clean. Just make sure whatever you use is food-safe and can be sanitized regularly to maintain proper hygiene.
Between using a dedicated wine fridge and modifying a regular refrigerator, which option tends to produce more consistent results for aging soft cheeses like brie, and why?
A dedicated wine fridge generally produces more consistent results for aging soft cheeses like brie. Wine fridges allow more precise control of both temperature and humidity, which are crucial for soft cheeses. Regular refrigerators often run colder and have lower humidity, making it harder to maintain the ideal aging environment without significant modifications.
Are there any budget-friendly options for setting up a cheese cave if I don’t have space for another fridge, or does it really make a big difference compared to just using my basement?
If your basement stays consistently cool (ideally between 50–55°F) and humid (around 80%), it can work well for aging cheese, especially hard cheeses. You can use inexpensive hygrometers and a small fan or bowl of water to adjust humidity. While a dedicated fridge offers more control, many home cheesemakers successfully use basements if conditions are right.
Could you give more details on affordable options for maintaining proper humidity in a closet or basement cheese cave setup, in case I don’t have access to a dedicated wine fridge?
To maintain humidity affordably in a closet or basement setup, you can use simple solutions like placing shallow pans or trays of water inside your cave. Adding a small fan nearby helps circulate air and distribute moisture evenly. For better control, consider using a digital hygrometer to monitor humidity and add or remove water as needed. Damp sponges or wet towels hanging inside can also boost humidity levels effectively.
You mentioned that hard cheeses and soft cheeses require different temperature and humidity levels. Can you provide suggestions for managing multiple types of cheese in the same aging space, or is it better to dedicate separate areas for each style?
Managing different cheese types in a single aging space can be tricky because hard and soft cheeses need different conditions. If you only have one space, try using separate containers or boxes with adjustable vents to create microclimates. Otherwise, for optimal results, dedicate separate areas or fridges for each style to control temperature and humidity more precisely.
What’s a realistic amount of time I should expect to age a beginner-friendly cheese like gouda at home, and are there signs I should watch for to know if things are going wrong during the process?
For a beginner-friendly Gouda, you can expect to age it at home for about 1 to 3 months. During aging, watch for unusual mold colors (black, pink, or fuzzy), sour or rotten smells, and excessive cracks or wet spots—these can signal problems. Healthy Gouda should develop a firm texture, mild aroma, and a golden rind as it matures.
For someone just starting out and on a budget, which specific tools or equipment would you recommend prioritizing first to get a reliable home cheese aging setup going?
To start cheese aging at home on a budget, focus on getting a small dorm-style fridge, a reliable thermometer and hygrometer to monitor conditions, and a container or tray for humidity control (like a plastic box with a lid and a damp sponge). These basics will let you create a controllable aging environment without overspending.
You mention that certain cheeses require different humidity and temperature ranges. If I want to age both hard and soft cheeses at once, is there a way to adjust the environment for each within the same fridge or space?
Aging both hard and soft cheeses in the same fridge can be tricky since they need different humidity and temperature levels. One solution is to use airtight boxes or containers inside the fridge. Place your soft cheeses in containers with a damp paper towel for higher humidity, and keep hard cheeses in separate boxes with less moisture. This way, you can create mini-environments for each cheese type within the same space.
How long does it typically take for beginner cheeses to age properly in a home setup, and are there any warning signs or troubleshooting tips if the cheese develops unwanted mold during the process?
Beginner cheeses like ricotta salata, queso fresco, or paneer usually require just a few days to a couple of weeks to age in a home cave. If you notice blue, black, or fuzzy mold spots, scrape them off with a clean knife and monitor closely. Consistent temperature and humidity are key—too much moisture can encourage unwanted mold, while too little can dry out the cheese. If the smell turns sharply unpleasant or ammonia-like, it’s best to discard the cheese.
Can you explain the pros and cons of using a converted wine fridge versus a regular fridge for aging both hard and soft cheeses? I’m wondering if there’s a big difference in terms of results or ease of maintenance.
A converted wine fridge gives you better control over temperature and humidity, which is crucial for aging both hard and soft cheeses successfully. Regular fridges are colder and drier, often drying out cheeses or causing unwanted mold. Wine fridges are easier to maintain at cheese-friendly conditions but can cost more upfront. For best results and less daily adjustment, a wine fridge is the better option.
For someone new to aging cheese at home, how important is it to have gentle airflow in the cave setup, and what’s a simple way to add circulation without drying out the cheeses?
Gentle airflow is quite important in a home cheese aging cave because it helps prevent mold overgrowth and keeps humidity levels more consistent. To add circulation without drying out your cheeses, you can use a small computer fan on a timer or set to the lowest setting. Make sure it doesn’t blow directly on the cheeses but circulates air around the space. Placing a bowl of water in the cave can help maintain humidity.
How crucial is it to adjust humidity for different cheese types if you’re aging a mix at the same time in one fridge, or do you tend to stick with similar styles per batch?
Adjusting humidity is pretty important when aging different cheese types, since soft cheeses need higher humidity while harder cheeses prefer a bit less. If you’re aging a mix in one fridge, it’s best to choose cheeses with similar humidity needs per batch. Otherwise, you risk one style aging well while another might dry out or develop unwanted rinds.
For someone on a tight budget, what are the absolute essentials to prioritize when setting up a basic home cheese aging cave, and what can be added later as I get more serious about affinage?
Start with a used mini fridge (converted with an external thermostat), a cheap hygrometer for humidity, and a small container of water to boost moisture. These basics will let you control temperature and humidity—key for aging cheese. Later, you can upgrade to better shelving, a digital humidifier, and specialized mats or containers as your cheese-making hobby grows.
If I set up a cheese cave in a basement corner instead of a dedicated fridge, what are the most common problems with airflow or sanitation I should watch out for, and how can I prevent them?
When using a basement corner, poor airflow can lead to uneven aging and unwanted mold growth. To prevent this, use a small fan for gentle circulation and avoid blocking vents. Sanitation is also key—regularly clean shelves, trays, and walls, and monitor for pests or excess humidity. A hygrometer helps keep humidity in check, while wiping surfaces with food-safe sanitizers reduces contamination risks.
If I only have a spare closet to use for aging cheese, what sort of additional equipment would I need to reliably hit the right temperature and humidity ranges mentioned in the guide?
To turn a closet into a cheese aging cave, you’ll need a small wine fridge or temperature-controlled mini fridge for stable temperatures. To manage humidity, add a digital hygrometer and a small humidifier or wet sponge inside the setup. Make sure there’s good air circulation—battery fans can help. Regularly monitor and adjust both temperature and humidity.
Once I have my cheese cave set up with the right tools, how long should I expect most hard cheeses like cheddar to age before they reach the best flavor and texture at home?
For most hard cheeses like cheddar, aging at home usually takes a minimum of 3 to 6 months to develop good flavor and texture. Some people prefer to age cheddar for 9 to 12 months or even longer for a sharper, more complex taste. Keep monitoring the cheese regularly for texture and flavor changes during the process.
Could you provide more guidance on how to adapt a spare closet or basement corner for cheese aging if I don’t have a wine fridge? What sort of additional equipment would be necessary in those cases?
To adapt a closet or basement corner for cheese aging, focus on controlling temperature and humidity. You’ll need a small portable air conditioner or fan to keep temperatures between 50-55°F, a humidifier to maintain 75-95% humidity, and a digital thermometer-hygrometer to monitor conditions. Consider adding shelves or wire racks for airflow around the cheeses. Regularly check for mold and adjust airflow as needed.
How important is airflow in a home cheese aging cave setup, and what kind of equipment would you suggest for gentle circulation without risking the cheeses drying out or getting unwanted molds?
Airflow is crucial for maintaining the right humidity and preventing unwanted mold in your cheese aging cave. For gentle circulation, a small, low-speed computer fan or a mini desk fan set on a timer works well. Position the fan so it doesn’t blow directly on the cheeses to avoid excessive drying. Regularly monitor both humidity and airflow to create a balanced environment.
I have a basement corner that stays pretty cool but has no airflow. Is adding a small fan enough to prevent mold hotspots, or do I need something more involved for proper circulation?
A small fan can definitely help improve air circulation and reduce the risk of mold hotspots in your basement cheese cave. Make sure the fan is set on a low setting and not blowing directly on the cheese. Also, monitor humidity and temperature regularly to ensure a stable environment. If you still notice uneven mold growth, you might consider repositioning the fan or adding a second one for better airflow.
Could you give more detail on how to prevent unwanted molds while still allowing the beneficial microbes to develop, especially if my setup is in a basement corner with variable humidity?
To prevent unwanted molds, regularly clean your shelves and containers with vinegar solution, and use breathable mats to keep cheeses off surfaces. Maintain steady humidity by using a hygrometer and adjusting with bowls of water or desiccant packs as needed. Good airflow is essential—crack the door slightly or use a small fan on a timer. Monitor your cheeses daily, brushing off any unwanted mold gently, while allowing natural rinds to develop for beneficial microbes.
Could you give an example of how you’d set up shelving and airflow in a small closet or basement corner to avoid mold hotspots while aging different cheeses?
In a small closet or basement corner, use wire or slatted shelves to let air circulate around your cheeses. Leave space between each cheese and avoid stacking them. Place a small fan or computer fan on a timer to encourage gentle airflow, and monitor humidity with a hygrometer. Rotate cheeses regularly and wipe any condensation to prevent mold hotspots.
For someone just starting out with affinage, what would you recommend as the most budget-friendly way to set up proper airflow and shelving in a small basement corner?
For a budget-friendly setup, try using a small wire shelving unit to maximize airflow around your cheeses. Place a basic box fan nearby to encourage gentle air movement. Make sure the shelving is raised off the floor, and monitor humidity so the airflow doesn’t dry out your cheeses too much.
What are some signs that the airflow in my aging fridge isn’t sufficient and how can I adjust it to avoid mold hotspots like the article warns about?
If your airflow isn’t sufficient, you might notice uneven mold patches, musty odors, or damp spots inside your fridge. To improve airflow, try repositioning cheeses for space between them, use a small circulating fan, and check that vents aren’t blocked. Regularly rotating your cheeses can also help distribute air and prevent mold hotspots.
Could you give some advice on choosing between setting up my cave in a basement corner versus using a beverage cooler? I’m wondering about the pros and cons for beginners with limited space.
A basement corner can offer stable temperatures and humidity if insulated well, but it may require more effort to control conditions. A beverage cooler is compact, easier to adjust, and fits small spaces, making it a practical choice for beginners. However, it may have limited capacity and need tweaks for humidity. Assess your space, budget, and willingness to monitor conditions frequently.
For someone just getting into home cheesemaking, how do you monitor and control both temperature and humidity inside a repurposed refrigerator without investing in expensive equipment?
You can use an affordable digital thermometer-hygrometer combo to keep an eye on both temperature and humidity inside your fridge. For humidity, place a shallow pan of water to raise it, or add desiccant packs to lower it. Adjust temperature by tweaking the fridge’s thermostat or using a simple external plug-in thermostat controller, which is much cheaper than commercial equipment.
When using a repurposed refrigerator as a cheese aging cave, how do you control both temperature and humidity accurately? Is there a particular brand or model of environmental controls you recommend for beginners?
To manage temperature in a repurposed fridge, an external thermostat like the Inkbird ITC-308 is popular and easy for beginners. For humidity, a digital humidity controller such as the Inkbird IHC-200 works well. Pair the humidity controller with a small ultrasonic humidifier inside the fridge for stable conditions. These devices are user-friendly and reliable for home cheese aging.
Could you clarify how to control and monitor humidity levels inside a repurposed refrigerator to make sure it stays consistent for different styles of cheese?
To control and monitor humidity in a repurposed fridge, use a digital hygrometer to track levels. Add a bowl of water or a damp sponge to increase humidity, or use a small fan to improve air circulation. For precise control, consider a plug-in humidifier or dehumidifier. Adjust these based on the specific cheese style’s recommended humidity range.
How much does it usually cost to get all the basic tools and equipment together for a small home cheese aging setup like the ones you describe? I’m trying to figure out if this is manageable on a college budget.
Setting up a basic home cheese aging cave can be surprisingly affordable. For a small setup, expect to spend between $100 and $250. This covers a mini fridge or wine cooler, a hygrometer/thermometer, a small fan, aging mats, and basic containers. Shopping secondhand or using items you already have can help keep costs low and fit a college budget.
When choosing between a wine fridge and a modified spare fridge for a home cheese cave, what should I consider in terms of insulation, airflow, and energy use? I’d like to get started without overspending if possible.
A wine fridge often provides better insulation and more consistent temperature control, which is great for aging cheese, but can be pricier. Modified spare fridges are cheaper upfront but may struggle with airflow and might need extra tweaks, like adding a fan or humidity control. In terms of energy use, wine fridges typically use less power since they’re smaller and more efficient. If budget is a big concern, a spare fridge can work with a few modifications; just be sure to monitor temperature and humidity closely.
For someone starting out with a limited budget, do you recommend investing in a wine fridge over converting a closet or basement area? How do the results typically compare when it comes to consistency of aging?
If your budget is limited, converting a closet or basement can be a cost-effective start, but controlling temperature and humidity may be challenging. A wine fridge offers much better consistency for aging cheese, especially for beginners, since it keeps conditions stable. If your goal is reliable results, the wine fridge is usually worth the investment.
I’m trying to decide between using a basement corner or investing in a wine fridge for cheese aging. Are there specific challenges to watch for when adapting a regular space compared to a dedicated appliance?
Adapting a basement corner can be tricky because temperature and humidity levels often fluctuate, making it harder to control the environment your cheeses need. A wine fridge is more consistent and easier to adjust, but you’ll still need to monitor humidity closely, as many fridges are too dry without modification.
I only have an old spare fridge in the garage and I’m worried about maintaining both humidity and airflow—what specific environmental controls or equipment should I invest in to get started on a budget?
You can turn your spare fridge into a functional cheese cave by adding a digital temperature controller to keep temps steady and an inexpensive hygrometer to monitor humidity. To increase humidity, use a small pan of water or a humidity controller with a reptile fogger. For airflow, add a small computer fan set on a timer to gently circulate air inside. These simple tools will help you get started without a big investment.
Can you elaborate a bit more on how much daily maintenance is involved with a DIY cheese cave setup, particularly regarding airflow and sanitation? I want to make sure I understand the ongoing effort required.
Daily maintenance for a DIY cheese cave involves checking temperature and humidity, ensuring good airflow by briefly opening the cave or adjusting vents, and wiping away any excess moisture to prevent mold. Sanitation usually means a quick visual inspection and regular cleaning of shelves and surfaces—generally about 10–15 minutes each day, with a deeper clean weekly.
Could you share more about what types of shelving materials work best for airflow and sanitation in a home cheese aging setup, especially in smaller spaces like a closet?
Wire shelving is a top choice for home cheese aging, especially in small spaces, because it allows excellent airflow around your cheeses and is easy to clean. Stainless steel wire racks are particularly good—they resist rust and sanitize easily. If wire isn’t possible, food-grade plastic shelves with perforations can also work, but avoid wood in tight spaces since it’s harder to keep sanitary.
What kind of shelving works best inside a repurposed refrigerator for cheese aging? Do certain materials, like wood versus metal, affect mold growth or sanitation?
Wooden shelves are commonly used in cheese aging because they help regulate humidity and can support beneficial mold growth. However, they require diligent cleaning to prevent unwanted mold or bacteria. Metal shelves are easy to sanitize and clean but may not maintain humidity as well. If you use metal, opt for food-grade stainless steel. Ultimately, both materials work, but wood is preferred for traditional aging if you can commit to regular maintenance.
When setting up airflow for a home cheese cave, especially in a small closet or basement, what kind of circulation system works best to avoid those mold hotspots you mentioned, and how often should the air be exchanged?
For small spaces like closets or basements, a computer fan or small clip-on fan works well for gentle air movement. Position it so air circulates without blowing directly on the cheese. Aim to exchange the air about once a day by briefly opening the door or using a ventilation duct; consistent, mild airflow helps prevent mold hotspots.
Before I invest in extra equipment, about how much ongoing maintenance does a home cheese cave require, especially in terms of cleaning and monitoring? I’m trying to figure out if I can realistically fit this into my routine.
A home cheese cave does require some regular upkeep, but it’s manageable for most routines. You’ll need to check temperature and humidity daily, wipe up any condensation weekly, and give the interior a thorough cleaning every 1–2 months. Maintaining proper airflow and monitoring for mold are also key, but these tasks don’t usually take much time.
You mention that gentle airflow is important to prevent mold hotspots. Do you have any tips for setting up safe and effective air circulation in a small home cheese cave without risking the cheese drying out?
To maintain gentle airflow in a small cheese cave, try using a low-speed computer fan or a small USB fan set on a timer to run for a few minutes every hour. Position the fan so it circulates air without blowing directly on the cheese. Also, consider placing a bowl of water in the cave to help maintain humidity and prevent the cheese from drying out.
Can you suggest some budget-friendly ways to set up a cheese aging cave if I only have a spare closet, not a fridge or cellar?
You can turn a spare closet into a simple cheese aging cave by using a small, inexpensive temperature and humidity monitor, a portable fan for airflow, and trays or wire shelves for your cheese. To control humidity, place a shallow pan of water inside and add or remove water as needed. For temperature, use ice packs or a small space heater depending on your climate, but be sure to check levels daily.
How long does it typically take to set up a home cheese aging cave with all the necessary tools and equipment, and is it possible to do it on a pretty tight budget?
Setting up a home cheese aging cave can usually be done in a weekend if you have all your tools and equipment ready. Many people use an old fridge or wine cooler with a temperature and humidity controller, which keeps costs down. With some DIY effort and smart shopping, it’s definitely possible to get started on a tight budget.
For someone with limited basement or closet space, what’s the most budget-friendly way to monitor and control both temperature and humidity for affinage without sacrificing cheese quality?
A small wine fridge is a practical and budget-friendly option for affinage in tight spaces. To control humidity, add a small bowl of water or a damp sponge inside. For monitoring, affordable digital thermometers and hygrometers work well. This setup helps maintain stable conditions without needing much room.
In terms of budget, what are the bare minimum tools or equipment needed to set up a functional cheese cave, and where can one prioritize spending for the best impact on cheese quality?
To set up a basic home cheese cave on a budget, you’ll need a small, adjustable mini fridge, a reliable hygrometer and thermometer combo, and a container or bowl for humidity control (like a tray of water or damp sponge). Prioritize spending on the fridge with precise temperature control, as this has the greatest impact on cheese quality. Basic racks for airflow are helpful, but you can improvise with clean wire racks or plastic grids.
If I’m using a closet instead of a fridge, how difficult is it to maintain that 75–95% humidity range? What equipment do I need, and how often should I expect to monitor and adjust it?
Maintaining 75–95% humidity in a closet can be challenging, as most homes are much drier. You’ll need a reliable hygrometer to monitor humidity, a small humidifier or damp towels to add moisture, and possibly a small fan for air circulation. Expect to check humidity levels daily and adjust as needed, especially at first until you find a routine that works.
For someone with a limited budget using a basement corner, what are the most cost-effective tools or methods to achieve the 75–95% humidity range you recommend for optimal cheese aging?
A basic digital hygrometer is great for monitoring humidity, and an affordable small room humidifier can help maintain the right range. If you need a low-budget approach, place shallow trays of water or damp sponges near the cheese in your cave setup. Adjust the amount as needed to keep humidity within 75–95%.
The guide mentions air circulation as important for preventing mold hotspots. Could you elaborate on what types of fans or ventilation systems work best for gentle airflow in a small home cheese cave?
For a small home cheese cave, a simple computer fan or a small USB-powered fan typically provides enough gentle airflow without drying out the cheese. Place the fan near the top or side and run it intermittently—about 15 minutes every hour is often sufficient. Make sure the air movement is gentle and not directly blowing onto the cheese to avoid excessive moisture loss.
For someone just starting out with a limited budget, what are the essential tools and equipment I should prioritize when setting up a basic cheese aging cave in a basement or closet?
For a basic setup on a limited budget, prioritize a small, used mini fridge or wine cooler for temperature control, a simple thermometer and hygrometer to monitor conditions, and a shallow tray with water for humidity. Cheese mats and plastic storage containers are helpful but not absolutely necessary at first.
Is it possible to age both hard and soft cheeses in the same home cave setup, or do they really need separate spaces since their ideal humidity and temperature ranges are different?
It is possible to age both hard and soft cheeses in the same home cave, but it’s not ideal. Hard and soft cheeses do need different humidity and temperature levels for best results. If you want to age both, try using separate containers or zones within your cave to better control conditions for each type.
When using a repurposed refrigerator as a cheese cave, do you recommend any specific modifications or equipment to better control humidity, especially for soft or washed rind cheeses that need high moisture?
For soft or washed rind cheeses, maintaining high humidity is key. Use a digital hygrometer to monitor levels, and consider adding a humidity controller to automate a humidifier or a bowl of distilled water inside. For extra moisture, place a clean, damp sponge or towel in the fridge, but check regularly to prevent mold growth.
I’m curious about how much regular maintenance or monitoring is required to keep a home cheese aging cave at the ideal conditions, especially in a repurposed space like a closet or basement.
A home cheese aging cave, especially in a repurposed space, does require consistent monitoring. You’ll want to check temperature and humidity daily at first, using reliable gauges. Adjust the humidifier, dehumidifier, or cooling unit as needed. Inspect cheeses for mold and turn them as necessary, usually once a week. Over time, once conditions stabilize, you may only need brief checks every few days.
What are some affordable environmental controls or DIY solutions you’d recommend for someone setting up a cheese aging cave in a basement corner rather than a dedicated wine fridge?
You can use a small, secondhand mini fridge with an external temperature controller to keep temperatures steady. For humidity, a simple digital hygrometer helps monitor levels, and you can boost humidity by placing a tray of salted water or a damp sponge inside. Some people also use computer fans for better air circulation if needed.
You talked about gentle airflow to prevent mold hotspots. Can you recommend any specific fans or airflow solutions that fit inside a smaller wine fridge or beverage cooler without drying out the cheese?
For small wine fridges or beverage coolers, USB-powered fans are a good choice because they’re compact and generate gentle airflow. Look for ones with adjustable speeds so you can keep air movement minimal. Place the fan away from the cheese and avoid pointing it directly at your wheels to prevent drying. You might also use a small computer fan with a USB adapter. Just remember to monitor humidity, as even small fans can reduce moisture levels over time.
If my basement stays pretty cool year-round but the humidity is inconsistent, what are some reliable ways to boost and monitor humidity for affinage without investing in a dedicated fridge?
To raise humidity in your basement, you can use simple solutions like placing trays of water or damp sponges near your cheeses. Some people hang wet towels as well. To monitor humidity, a digital hygrometer is affordable and provides accurate readings. You may need to adjust water trays or towels regularly to keep levels steady.
How do you recommend maintaining stable humidity in a repurposed refrigerator, especially during seasonal weather changes? Are there specific tools or techniques that work well for monitoring and adjusting humidity closely?
To maintain stable humidity in a repurposed refrigerator, use a digital hygrometer-thermometer combo to monitor levels closely. Adjust humidity with a pan of water or damp sponges for higher humidity, or use silica gel packs to lower it. Humidistats and small ultrasonic humidifiers offer more precise control, especially during seasonal changes.
If I want to age both hard and soft cheeses in the same home setup, is it possible to adjust temperature and humidity zones within a single fridge, or do I need completely separate spaces?
It’s challenging to create separate temperature and humidity zones for hard and soft cheeses in a single fridge, as most home units don’t allow precise zone control. For best results and to prevent cross-contamination, use completely separate spaces or consider dividing the fridge with airtight containers, each with its own humidity control.
If I want to age both hard and soft cheeses at the same time, is it possible to maintain suitable temperature and humidity levels for both in a single cheese cave setup, or do I need separate spaces?
Aging both hard and soft cheeses together in one cave is possible, but it can be tricky. Soft cheeses usually need higher humidity and slightly cooler temperatures than hard cheeses. If you use one space, you might need to compromise between the ideal conditions for each. Many home cheesemakers use separate containers or aging boxes within the same cave to create microclimates for each cheese type. This helps maintain better conditions for both without needing fully separate spaces.
I’m considering setting up a cheese cave in my basement, but the temperature sometimes dips below 50°F in winter. Would that affect my aging process, or are there ways to stabilize the temperature for hard cheeses like cheddar?
If your basement temperature drops below 50°F, it could slow down or even halt the aging of hard cheeses like cheddar, which generally prefer a range of 50–55°F. To stabilize the temperature, you could use a small wine fridge or a modified refrigerator with an external temperature controller. This setup allows you to maintain the ideal conditions throughout the year.
Could you provide a bit more detail on maintaining gentle airflow in a repurposed closet or basement setup? Is a small fan sufficient, or are there best practices to avoid drying out the cheeses?
A small fan can help maintain gentle airflow, but it should not blow directly on the cheeses. Place the fan at a low setting, ideally facing a wall or set to oscillate, to ensure even air movement. Check humidity regularly and, if needed, use a humidifier to prevent the cheeses from drying out. Also, consider opening the door briefly each day to help with air exchange.
When setting up a cheese aging cave in a repurposed fridge, what is the best way to control both temperature and humidity accurately? Are there specific tools or brands you recommend for this setup?
To accurately control temperature in a repurposed fridge, use an external temperature controller like the Inkbird ITC-308. For humidity, a digital hygrometer helps monitor levels, and an evaporative humidifier (like those from Eva-Dry) or a simple tray of water can help raise humidity. Pairing these with a humidity controller, such as the Inkbird IHC-200, makes it easier to maintain the ideal environment for cheese aging.
Can you recommend any specific brands or models of environmental controls that work well for keeping humidity between 75 and 95 percent in a modified wine fridge?
For maintaining 75 to 95 percent humidity in a modified wine fridge, many home cheesemakers use the Inkbird IHC-200 humidity controller paired with an ultrasonic humidifier. The Eva-Dry EDV-1100 is also a reliable small dehumidifier if your fridge gets too damp. These options offer precise control and are fairly user-friendly for home setups.
Can you share more about what kind of airflow setup is needed? I’m worried about mold growing unevenly in a repurposed wine fridge.
To ensure even mold growth, you’ll want a gentle, consistent airflow. In a repurposed wine fridge, a small, battery-powered fan can circulate air without drying out your cheese. Position the fan so it doesn’t blow directly on the cheese. Also, open the door briefly each day to refresh the air and help regulate humidity.
For someone with a tight budget, are there any must-have tools you wouldn’t skip, or can some environmental controls be improvised in a basement setup?
If you’re on a tight budget, the essentials are a reliable thermometer and hygrometer to monitor temperature and humidity. Many people use a regular fridge with a simple external thermostat for control. In a basement, you can improvise by using plastic containers to help maintain humidity, and a small fan for airflow if needed. The key is stable conditions, even if the setup is low-cost.
Could you elaborate on how airflow should be managed within a closet-based cheese aging setup? I am concerned about over-drying the cheeses if I introduce a fan for circulation.
Airflow in a closet-based cheese aging setup should be gentle to avoid over-drying your cheeses. Rather than a strong fan, consider using a small computer fan set on a timer, running for short intervals each hour. Position the fan so it doesn’t blow directly on the cheeses, but circulates air around the space. Monitor humidity regularly and add a humidifier or water tray if needed to maintain optimal moisture.
For someone considering a repurposed refrigerator versus a dedicated wine fridge, are there any specific challenges or limitations in maintaining consistent humidity and temperature levels, especially for soft or washed rind cheeses?
Repurposed refrigerators often have stronger cooling cycles and less precise controls, which can cause temperature and humidity fluctuations—these are especially tricky for soft or washed rind cheeses. Wine fridges generally offer gentler, more stable environments, but may still need a humidity boost with water trays or humidifiers. Whichever you choose, regular monitoring is important to avoid spoilage.
For people on a tight budget who can’t get a dedicated wine fridge, how reliable is converting a spare closet or basement with some extra equipment? Are there any must-have tools you’d recommend for monitoring temperature and humidity in those setups?
Converting a closet or basement can definitely work for aging cheese, though it requires careful monitoring, since these spaces are less stable than a wine fridge. A digital thermometer and hygrometer are must-haves to keep track of temperature and humidity. You might also consider a small humidifier or dehumidifier and a fan for air circulation if needed.
If I use a repurposed refrigerator for cheese aging, how do I accurately control both humidity and temperature, especially since regular fridges tend to be quite dry inside?
To control humidity and temperature in a repurposed fridge, use an external temperature controller to keep it between 50-55°F. For humidity, add a digital hygrometer to monitor levels, and place a shallow tray of water or a damp sponge inside. Adjust the amount of water or use a small humidifier if needed to maintain 75-90% humidity.
If I’m using a repurposed fridge as my cheese cave, what’s the best way to control and monitor both humidity and temperature reliably over time? Are there DIY solutions you recommend, or is it better to invest in special equipment?
For steady temperature and humidity, many people use a fridge thermostat controller and a dedicated humidifier or damp sponge. DIY options can work, but commercial controllers for both temperature and humidity are more accurate and easier long-term. Digital hygrometers and thermometers help you monitor conditions. If you plan on aging cheese regularly, investing in specialized equipment gives more control and peace of mind.
You mention both repurposing a spare fridge and using a closet or basement space. What are the main challenges of using a closet compared to a fridge, especially when trying to maintain the right temperature and humidity levels?
Using a closet instead of a fridge can make it much harder to control temperature and humidity, which are crucial for aging cheese. Closets usually fluctuate with household conditions and lack built-in cooling. You’d likely need extra tools like humidifiers, dehumidifiers, or portable AC units to maintain stable conditions in a closet, while a fridge offers more precise, consistent control.
If I set up a cheese cave using a repurposed mini fridge, how do I best control and monitor the humidity to keep it within the recommended range for different cheeses?
To control humidity in a mini fridge cheese cave, use a digital hygrometer to monitor levels. Place a shallow tray of water or damp sponges inside to boost humidity. For drier cheeses, reduce water or open the fridge briefly to decrease moisture. Regularly check and adjust based on your specific cheese needs.
For someone just starting out with a limited budget, would you recommend investing in a dedicated wine fridge right away, or are there reliable low-cost alternatives to get the right environment?
You don’t have to invest in a wine fridge immediately. Many beginners use a small, clean mini-fridge with a temperature controller to create a suitable cheese aging environment. You can monitor humidity with an affordable hygrometer and add a bowl of water or a damp sponge to help maintain moisture levels.
For someone living in a humid climate, do you have any tips on preventing unwanted molds or bacteria when aging cheese in a repurposed refrigerator?
To reduce unwanted molds or bacteria in a humid climate, keep the refrigerator clean by wiping it down with a vinegar solution before aging cheese. Use a hygrometer to monitor humidity and aim for 75–85%. If it gets too humid, place a bowl of dry salt or baking soda inside to absorb moisture. Also, check and clean surfaces regularly to prevent mold buildup.
I’m curious about airflow—do you recommend installing a small fan inside a wine fridge cheese cave, or is the natural air movement from opening the door enough to prevent mold hotspots?
A small fan inside your wine fridge cheese cave is a good idea. Natural air movement from just opening the door usually isn’t enough to ensure even airflow, which can help prevent mold hotspots and keep your cheeses aging evenly. Just keep the fan on a low setting to avoid drying out the cheese.
If I use a spare fridge as a cheese cave, what’s the best way to control both humidity and temperature accurately, and do I need to modify the fridge in any way to allow for gentle airflow?
To control humidity and temperature in a spare fridge, use an external temperature controller and a digital hygrometer. For humidity, place a small container of water or a dedicated humidifier inside. To allow for gentle airflow, you can slightly prop the door open with a stopper, or install a small computer fan inside. No major modifications are needed, just ensure good air circulation without causing drafts.
If I set up my cheese aging cave in a basement corner, how do I reliably maintain both the temperature and the high humidity these cheeses need, especially during hot or cold months?
To maintain steady temperature and humidity, use a dedicated wine fridge or mini refrigerator with an external thermostat for precise temperature control. For humidity, place a tray of water or damp sponges inside and monitor with a hygrometer. During extreme weather, adjust ventilation or add a small humidifier or dehumidifier as needed to keep conditions stable.
I’m curious about humidity control in a repurposed refrigerator. What is the easiest way to maintain 80–90% humidity inside without causing excess condensation or mold issues?
To keep humidity at 80–90% in a repurposed fridge, use a small container of water or a damp sponge inside, monitoring with a hygrometer. Adjust the water surface area if humidity gets too high. For airflow, crack the door slightly or install a small fan to prevent stagnant air and limit mold growth. Wipe away any condensation that builds up on surfaces.
Could you explain how often I should check or adjust the temperature and humidity in a homemade cheese cave to keep cheeses safe, especially in a setup like a basement corner?
For a homemade cheese cave, especially in a basement corner, it’s best to check temperature and humidity at least once daily. Conditions can change quickly, so monitor both with reliable gauges. Adjust settings or ventilation as needed to keep temperature between 50–55°F and humidity around 80–85% to keep cheeses safe.