
Introduction
Imagine stepping outside your back door to a living tapestry of color and motion—swallowtails gliding past milkweed, Monarchs sipping from blazing star, and tiny skippers dancing atop coneflowers. While most suburban backyards are dominated by turfgrass and ornamental shrubs, transforming even a small, patchy lawn into a butterfly sanctuary is both attainable and deeply rewarding. This case study follows the journey of a typical homeowner, Alex, who turned a neglected 600-square-foot backyard into a thriving pollinator haven in just two seasons. Get ready for a detailed, practical look at the entire process: from site assessment and plant selection, to design, setbacks, and ongoing stewardship. Whether you want to dedicate a corner or your entire yard, this comprehensive guide will help you avoid common pitfalls and maximize your impact for both butterflies and the wider ecosystem.
Background: The Starting Point
Meet the Homeowner
Alex lives in a mid-sized city in the Midwest, with a typical rectangle-shaped backyard—roughly 30 by 20 feet. The space was dominated by patchy grass, a few overgrown boxwoods, and a random assortment of garden gnomes. The soil was compacted, and drainage was poor in the low-lying corner. Alex’s goal: create a butterfly sanctuary that would be visually appealing, low-maintenance, and support native pollinators.
Initial Challenges
- Heavy clay soil with poor drainage
- Invasive grass species and weeds
- Lack of existing pollinator plants
- Budget constraint of $1,000 for the first year
- Desire for year-round interest and easy maintenance
Step 1: Assessing and Planning the Space
Site Analysis
Alex began by spending several weeks observing sunlight patterns, drainage, and wind exposure. The southern half received at least 6 hours of sun daily, while the northern edge was shaded by a neighbor’s maple tree. Alex took soil samples to the local extension office for basic pH and texture testing, which confirmed heavy clay and a slightly acidic pH (6.2).
Goal Setting
- Attract at least five butterfly species by year two
- Include host plants for caterpillars—not just nectar plants
- Use only locally native species where possible
- Minimize turfgrass and use no pesticides
Design Principles
Alex sketched a rough plan, dividing the yard into:
- Sunny meadow section: For most sun-loving perennials
- Part-shade border: For woodland-edge species
- Pathways: Mulched for access and maintenance
- Water feature: Simple birdbath for butterflies to drink
Step 2: Preparing the Site
Removing Turf and Weeds
Alex opted for a low-impact method called sheet mulching:
- Mowed grass as low as possible
- Laid down overlapping layers of cardboard (free from local stores)
- Added 4-6 inches of shredded leaf mulch and compost
- Watered thoroughly and waited 8 weeks
This process smothered the grass and weakened weed roots, enriching the soil and improving structure—critical for the heavy clay.
Soil Amendments
- Added 2 cubic yards of compost (delivered, $80)
- Top-dressed with a thin layer of sand in low spots to aid drainage
Alex avoided peat moss and chemical fertilizers to keep the project eco-friendly and support beneficial soil microbes.
Step 3: Plant Selection and Sourcing
Choosing the Right Plants
Alex focused on a mix of host and nectar plants, emphasizing local native species to maximize butterfly attraction and ecosystem benefit.
- Host Plants (for caterpillars):
- Milkweed (Asclepias tuberosa, A. incarnata) for Monarchs
- Wild Senna (Senna hebecarpa) for Sulphur butterflies
- False Nettle (Boehmeria cylindrica) for Red Admirals
- Violets (Viola spp.) for Fritillaries
- Nectar Plants (for adults):
- Blazing Star (Liatris spicata)
- Purple Coneflower (Echinacea purpurea)
- Bee Balm (Monarda fistulosa)
- Golden Alexanders (Zizia aurea)
- New England Aster (Symphyotrichum novae-angliae)
For the shady border, Alex included Woodland Phlox and Zigzag Goldenrod, both valuable to early and late-season butterflies.
Where to Buy
- Local native plant nurseries (priority for healthy, pesticide-free stock)
- Seed exchanges and local wildflower societies (for cost savings)
- Online native plant retailers (as backup for harder-to-find species)
Alex avoided big-box garden centers to reduce the risk of purchasing plants treated with neonicotinoids, which are harmful to pollinators.
Step 4: Planting and Initial Setup
Planting Timeline
- Early Spring: Direct-sowed native seeds that require cold stratification
- Late Spring: Planted plugs and potted perennials after last frost
Planting Techniques
Alex spaced plants in drifts (groups of 3-7) for a natural look and maximum butterfly visibility. Host plants were intermingled with nectar plants. Deep watering at planting helped roots establish, especially in the clay soil. Mulched lightly around new plants to retain moisture and suppress weeds, being careful not to smother stems.
Adding Supporting Features
- Placed a shallow birdbath with flat stones for butterfly puddling
- Installed small logs and flat rocks for basking spots
- Left a small bare patch of soil for ground-nesting bees
Step 5: First Season Challenges and Solutions
Weed Pressure
Despite sheet mulching, aggressive weeds like crabgrass and bindweed emerged. Alex hand-pulled these weekly and used a thick mulch top-up in mid-summer. Patience was key, as native perennials often take a year or more to fully establish.
Watering and Drought
A July drought tested new plantings. Alex installed a simple soaker hose ($25) and watered deeply once per week, rather than shallow daily watering, to encourage deep rooting.
Critter Damage
Rabbits nibbled young violets and asters. Alex used wire cloches and, for especially vulnerable plants, a garlic spray deterrent until they grew larger.
Step 6: Monitoring Progress and Wildlife
Tracking Butterfly Visitors
Alex kept a logbook, recording butterfly sightings from late May through September. By the end of the first summer, the sanctuary had attracted:
- Monarchs (Danaus plexippus)
- Eastern Tiger Swallowtails (Papilio glaucus)
- Red Admirals (Vanessa atalanta)
- Painted Ladies (Vanessa cardui)
- Cabbage Whites (Pieris rapae)
Several species of native bees and moths also visited, proving that the plant choices benefited a broader range of pollinators.
Community Engagement
Neighbors became curious, and Alex used the opportunity to share information about native plants and butterfly conservation. A small laminated sign near the gate explained the project and discouraged pesticide use nearby.
Step 7: Year Two—Expanding and Refining
Filling Gaps
Some plants failed to thrive (notably, a few shade-loving species in unexpectedly sunny spots). Alex replaced these with more adaptable natives, like Black-eyed Susan and Coreopsis. A compost top-dressing improved weak areas.
Adding Vertical Layers
Alex introduced native shrubs, such as Spicebush (Lindera benzoin) and Buttonbush (Cephalanthus occidentalis), to provide shelter and host opportunities for additional butterfly species. A small trellis supported native vine Dutchman’s Pipe for Pipevine Swallowtail caterpillars.
Ongoing Maintenance
- Seasonal mulching to control weeds
- Minimal deadheading to allow seed formation (food for birds)
- Hand-pulling invasive weeds as needed
- Leaving standing stems through winter for overwintering insects
Results: Before and After
Visual Transformation
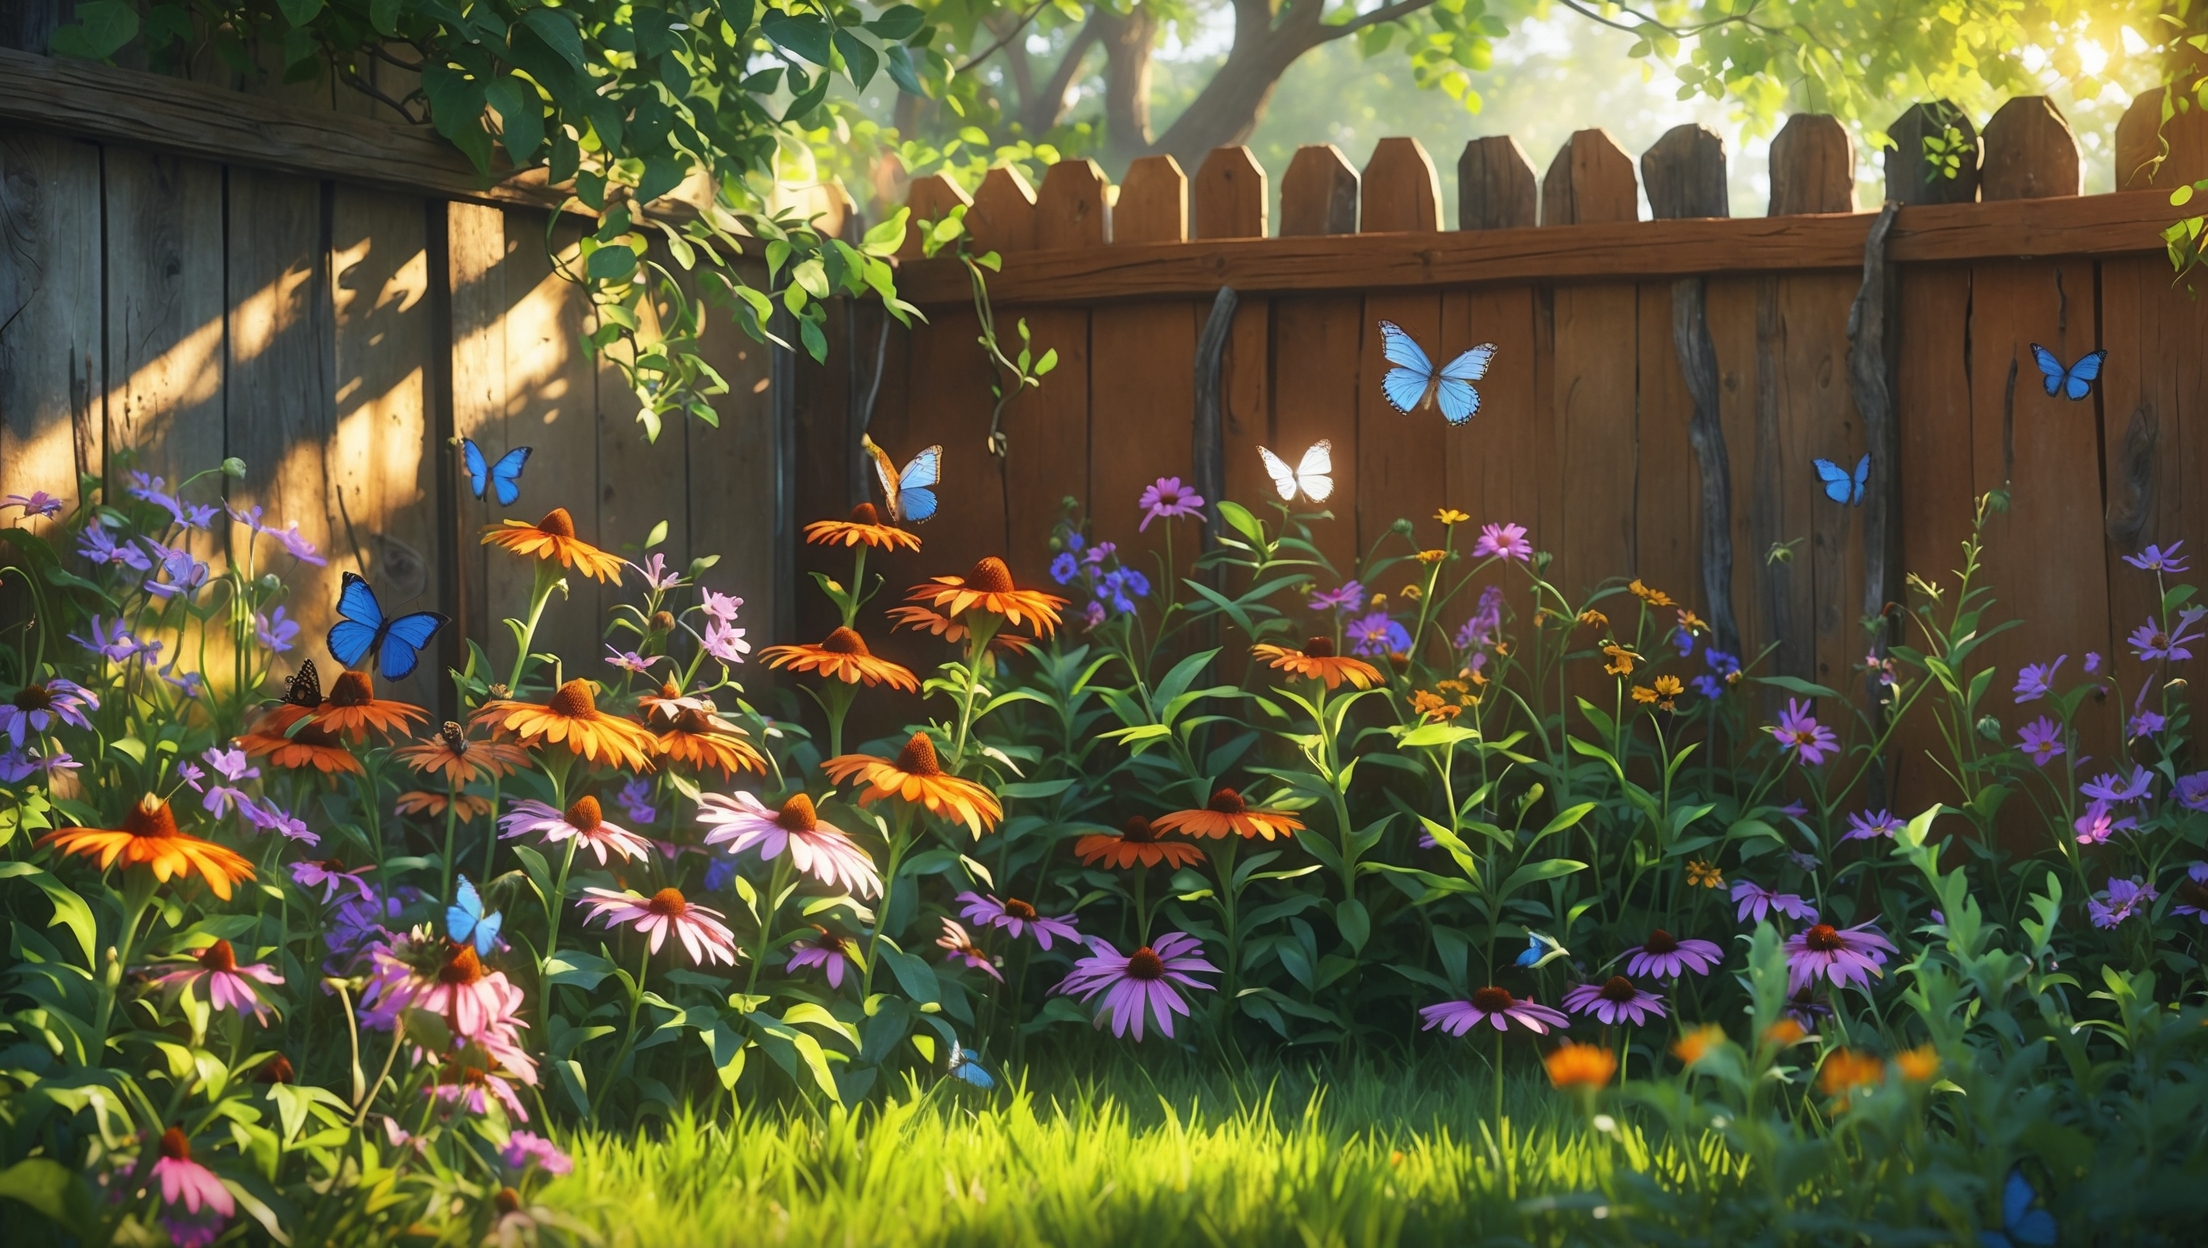
By the end of year two, the backyard had been transformed from a sparse, weedy patch into a dense, colorful oasis. Tall spikes of Liatris and Echinacea swayed above a carpet of violets and sedges. Butterflies were visible daily from June to September, and the space buzzed with life.
Butterfly and Pollinator Counts
Alex observed at least eight butterfly species regularly, including Monarchs, Swallowtails, Red Admirals, Sulphurs, Fritillaries, and Skippers. The presence of caterpillars on host plants indicated breeding success, not just transient visitors.
Budget Recap
- Native plants and seeds: $540
- Mulch and compost: $150
- Soaker hose: $25
- Birdbath: $35
- Miscellaneous (signage, tools, trellis): $100
- Total: $850 (well under budget)
Lessons Learned: Practical Takeaways
What Worked
- Using native host and nectar plants was crucial for attracting butterflies and building a resilient ecosystem.
- Sheet mulching simplified turf removal and improved soil health without chemicals.
- Grouping plants in drifts created a natural, visually appealing effect and made it easier for butterflies to find resources.
- Tracking sightings kept the project motivating and helped identify which plantings were most effective.
What Alex Would Do Differently
- Start with a more diverse mix of plugs and seeds to speed up establishment.
- Install rabbit fencing earlier to avoid losing young plants.
- Plan for more early-blooming species to help spring butterflies.
- Budget extra for soil amendments in very poor soil areas.
Expert Tips for Your Own Butterfly Sanctuary
- Start small: Even a 100-square-foot patch can make a difference.
- Prioritize native plants: Check local extension resources for the best species for your region.
- Layer heights: Combine groundcovers, perennials, and shrubs for a more resilient, attractive garden.
- Plan for year-round structure: Leave some seed heads and stems through winter.
- Avoid pesticides: Even “organic” options can harm caterpillars and pollinators.
- Share your results: Encourage neighbors to join you and create a neighborhood pollinator corridor.
Conclusion
Alex’s transformation from a struggling, patchy lawn to a lush butterfly sanctuary shows what’s possible when you combine careful planning, native plant selection, and a bit of patience. The step-by-step approach—starting with soil preparation and thoughtful design, then focusing on host and nectar plants—proves that you don’t need a large property or an unlimited budget to make a real difference. The biggest lesson? Nature responds quickly when given the right conditions. By year two, Alex’s backyard was alive with fluttering wings, buzzing bees, and vibrant blooms, all achieved without pesticides or excessive watering.
Creating a butterfly sanctuary is about more than just aesthetics. It’s an invitation for wildlife, a hands-on learning experience, and a powerful act of local conservation. Each native plant you add is a lifeline for pollinators facing habitat loss. Whether you follow this case study closely or adapt the principles to your own yard, you’ll be rewarded not just with beauty, but with a deeper connection to the rhythms of the natural world. Start small, be patient, and watch as your backyard becomes a haven for butterflies—and for you.
I also have heavy clay soil and drainage issues in my yard. Could you share more about the specific steps Alex took to improve drainage before planting, and if any particular amendments worked best?
Alex tackled drainage by first aerating the heavy clay soil with a garden fork and creating gentle slopes to direct excess water away from plant beds. He mixed in generous amounts of compost and coarse sand, which helped loosen the soil structure and improve water flow. Over time, he also added leaf mold and well-rotted manure, both of which boosted soil texture and fertility for the butterfly-friendly plants.
I noticed Alex had a budget of $1,000 for the first year. Could you break down how that money was allocated between plants, soil amendments, and other expenses? I’m hoping to do something similar and want to gauge realistic costs.
Alex allocated the $1,000 budget roughly as follows: about $450 went toward a variety of native plants and seeds, $200 was spent on soil amendments like compost and mulch, and the remaining $350 covered garden tools, a simple drip irrigation setup, and a few decorative features. This breakdown should give you a realistic idea of initial costs for a similar project.
With the $1,000 budget constraint Alex had, were there any plants or materials they chose to skip or prioritize to get the most impact for pollinators in the first season?
Alex prioritized native flowering plants with staggered bloom times to support pollinators throughout the season. They skipped expensive hardscaping and non-native ornamentals, instead investing mostly in starter perennials, milkweed, and a few annual seeds. Mulch and compost were bought in bulk to stretch the budget and help the new plants establish quickly.
I noticed Alex had a $1,000 budget for the first year. Can you break down the biggest expenses, and were there any areas where costs were unexpectedly higher or lower than planned?
Alex’s largest expenses were native plants and shrubs, which accounted for nearly half the budget. Materials for raised beds and soil amendments were also significant costs. One surprise was that decorative stones ended up costing less than expected because Alex found a local supplier with discounts. However, irrigation supplies were pricier than planned due to needing extra hose lengths and drip emitters.
I’m curious how Alex addressed the heavy clay soil and poor drainage in the low-lying corner—were there specific soil amendments or drainage solutions that proved most effective and affordable within the $1,000 budget?
Alex tackled the clay soil and drainage issues by mixing in compost and coarse sand to improve soil structure and permeability. For drainage, a simple gravel-filled trench (French drain) was installed in the low spot, which proved both effective and kept costs well within the $1,000 budget.
After removing the patchy grass and dealing with the compacted soil, did Alex run into any setbacks like persistent weeds or erosion before the new plants got established? If so, what strategies worked best to overcome those early problems?
Alex did encounter setbacks after removing the grass, especially persistent weeds that tried to take over before the new plants were well-rooted. Mulching the area heavily and routine hand-weeding helped suppress unwanted growth. Erosion was mild, but using straw mulch and planting ground covers quickly stabilized the soil while the main plants established themselves.
I noticed Alex had a budget of $1,000 for the first year. Were there specific areas where it was most important to invest, like soil amendments or more mature plants, to get the sanctuary established?
Yes, Alex prioritized spending on high-quality native plants, especially a mix of mature perennials and host plants for caterpillars, since these provided immediate habitat and food sources. Some funds also went toward soil amendments to ensure strong plant growth, but mature plants were the biggest investment early on.
I noticed Alex had a $1,000 budget for the first year. Was that enough to cover all the native plants and materials needed, or were there areas where costs had to be cut back or creative solutions found?
Alex’s $1,000 budget was enough to cover most of the essential native plants and materials, but there were a few areas where costs had to be trimmed. Alex used creative solutions like sourcing plants from local swaps, repurposing old garden edging, and starting some plants from seed to stay within budget.
My backyard also has drainage problems and heavy clay soil. Did Alex have to amend the soil a lot before planting, or did some native species handle those conditions pretty well right from the start?
Alex did need to amend the soil in some areas, especially where the clay was compacted and drainage was poor. However, several native species were chosen specifically because they tolerate heavy clay and occasional wet spots. So, a mix of light soil improvement and smart plant selection helped the sanctuary thrive.
I’m curious about how Alex improved the heavy clay soil with poor drainage. Did they amend it with compost, use raised beds, or both? Any specific steps would be helpful since my yard has similar issues.
Alex tackled the heavy clay soil by first loosening it with a garden fork and then mixing in plenty of compost to improve its texture and drainage. In some especially tough spots, raised beds were added to ensure better root health for plants. These steps helped create a healthier environment for both plants and butterflies.
I’m curious about the budget aspect—how did Alex decide which plants or materials to spend more on given the $1,000 limit? Were there areas where splurging made the most noticeable difference in attracting butterflies?
Alex prioritized spending more on native flowering plants that serve as both nectar sources and host plants for caterpillars, since these are crucial for attracting butterflies. Less was spent on decorative items and non-essential landscaping. Investing in well-established native plants made the biggest impact, as they drew butterflies more quickly and provided reliable habitat.
Could you share some tips on keeping the butterfly sanctuary looking good in winter or early spring? I want year-round interest, but not sure which native plants will still look nice outside the main butterfly season.
For winter and early spring interest, choose native grasses like little bluestem or switchgrass, which hold their form and color in cold months. Consider coneflower, black-eyed Susan, and asters for seed heads that look attractive and feed birds. Leave some stems and dried flower heads standing for visual texture and habitat. Evergreens or low-growing shrubs native to your area can also add structure year-round.
For beginners, how did Alex figure out which pollinator plants to choose for both sun and shade areas? Was there a resource or local expert that helped with matching plants to those specific backyard conditions?
Alex started by researching which native pollinator plants thrive in the local climate, focusing on options suited for both sunny and shaded spots. The article explains that Alex consulted a nearby native plant nursery and reached out to the local extension office for advice. Both resources helped match plant choices to the backyard’s varied sunlight conditions.
After the initial two seasons, did Alex notice any issues with invasive weeds creeping back in, and if so, what kind of maintenance routine ended up working best to keep them under control?
After the first two seasons, Alex did see some invasive weeds try to return, especially along the borders of the sanctuary. Regular hand-pulling every couple of weeks and adding a thick mulch layer around native plants helped keep weeds in check. Alex also scheduled occasional spot checks and removed any persistent invaders before they could spread.
Can you share more specifics on how Alex improved the heavy clay soil and dealt with poor drainage before planting? I have a similar yard and wonder what worked best within their $1,000 budget.
Alex tackled the heavy clay soil by mixing in several inches of compost and leaf mold to boost organic content and encourage better drainage. To address poor drainage, they created slightly raised beds using inexpensive untreated lumber and shaped planting areas into gentle mounds. These improvements fit comfortably within the $1,000 budget and helped roots thrive.
You mentioned that Alex’s soil was heavy clay with drainage problems—what specific amendments or methods worked best for improving that, and did you see a big difference the first season?
To improve Alex’s heavy clay soil, compost and coarse sand were mixed in deeply to boost drainage and texture. Raised beds were also added in soggier spots. These changes made a noticeable difference after the first season—water didn’t pool as much, and new plants established roots more easily.
How long did it take before butterflies actually started appearing in noticeable numbers? I’m curious how quickly a new butterfly garden becomes inviting to pollinators.
Butterflies began appearing in small numbers within about two weeks of planting, especially after the first few nectar-rich flowers bloomed. Noticeable numbers and regular activity picked up after roughly six to eight weeks, once more plants were established and flowering. The timing can vary depending on your local butterfly populations and how quickly your chosen plants mature.
I’m curious how Alex handled the drainage issues in that low-lying corner with the heavy clay soil. Did the case study mention any specific solutions or amendments that actually worked to improve water flow?
The case study explains that Alex improved drainage in the low-lying corner by mixing in coarse sand and compost to break up the heavy clay soil. He also added a shallow swale to direct excess water away from that area, which helped both water flow and plant health.
How did Alex decide which native plants would give both year-round interest and attract the most butterflies? Was there a resource or local expert that helped narrow it down without going over the $1,000 budget?
Alex consulted with the local native plant society and used online databases specific to the region to select plants that bloom in different seasons and support various butterfly species. By focusing on regionally recommended species and purchasing smaller starter plants, Alex was able to stay under the $1,000 budget.
I noticed Alex had a $1,000 budget for the first year. Were there any specific areas where costs could be cut or creative alternatives used, especially for someone trying to do this on even less money?
Alex could have saved money by starting more plants from seeds instead of buying mature ones, repurposing materials for garden beds, and sourcing mulch or compost from local community piles. Swapping plants with neighbors or joining local gardening groups for free seeds and cuttings are also great ways to reduce costs.
I noticed Alex had a budget of $1,000 for the first year. Could you share more about how they prioritized expenses, especially when it came to sourcing native plants versus addressing drainage issues?
Alex focused most of the initial budget on sourcing native plants, as they were essential for attracting local butterflies. To stay within budget, they chose smaller plant sizes and prioritized species vital for caterpillars and adults. For drainage issues, Alex used cost-effective solutions like creating gentle slopes and adding mulch rather than installing expensive systems, saving more funds for plants.
Two seasons seems pretty fast for such a transformation. Was there a particular step or strategy that helped Alex speed up progress on turning the lawn into a butterfly sanctuary?
Alex was able to speed up the transformation by using native plants that establish quickly and by removing the grass in sections to plant right away, rather than all at once. Mulching heavily also helped suppress weeds and keep the new plants healthy, making the sanctuary thrive faster.
About how much time did it take each week for Alex to maintain the butterfly sanctuary during the first season? I’m trying to figure out what kind of commitment I’d be signing up for.
During the first season, Alex spent about 2 to 3 hours each week maintaining the butterfly sanctuary. This included tasks like watering new plants, weeding, and monitoring for pests. The workload eased up in later months as the native plants became established.
If you only have a smaller space or can dedicate just a portion of your backyard, which steps from Alex’s process are most crucial to get a sustainable butterfly habitat started quickly?
To quickly establish a butterfly habitat in a small space, focus on planting native nectar flowers and host plants, minimizing pesticide use, and providing a shallow water source. Even a modest patch with these essentials can attract and support butterflies effectively.
With a $1,000 budget for the first year, did Alex have to make any tough choices about which features or plants to prioritize? I’d love some ideas on which investments give the most impact up front.
Alex did need to prioritize due to the $1,000 budget. He focused on native nectar and host plants first, which support butterflies throughout their life cycles. He delayed adding decorative features and expensive hardscaping, investing instead in quality soil, mulch, and a few key shrubs. For maximum impact, start with versatile native plants and create sheltering spots, then add extras as your budget allows.
I noticed Alex had a $1,000 budget for the first year. Were there any specific areas where it made the most sense to spend versus save? I’m trying to figure out where to focus my limited resources first.
Alex found it most worthwhile to invest in high-quality native plants and soil improvements, as these provide the core benefits for attracting butterflies. He saved money by repurposing materials for borders and making DIY plant labels. Prioritizing plants and soil health is usually the best first step if your budget is tight.
For those of us in similar climates, how much time did the process take each week for Alex during the initial setup and maintenance? I’m wondering if year-round interest also means year-round work.
During the initial setup, Alex spent about 4–6 hours each week preparing beds, planting, and establishing the garden over a couple of months. Once established, weekly maintenance dropped to about 1–2 hours for weeding, watering, and observing. Year-round interest mostly refers to plant variety and seasonal changes, not constant work—winter tasks are minimal.
After the initial two-season transformation, what sort of ongoing maintenance was required to keep invasive weeds at bay and ensure the pollinator plants continued to thrive year after year?
After the first two seasons, ongoing maintenance mostly involved regular weeding, especially in early spring and after rain when invasives sprouted. Mulching helped suppress weed growth. The pollinator plants needed occasional thinning and deadheading to stay healthy. Annual checks for plant crowding and replenishing any lost native plants were also important to help the sanctuary thrive.
How did Alex improve the drainage in the low-lying corner with heavy clay soil? I also have this issue in my backyard, and I’m wondering what methods were actually effective within the $1,000 budget.
Alex tackled the drainage issue by creating a shallow swale to redirect runoff and adding a mix of compost and coarse sand to the clay soil for improved permeability. He also planted moisture-tolerant native plants in the lowest spots. These changes stayed well within the $1,000 budget.
What did the ongoing maintenance look like during the first two seasons, especially in terms of controlling invasive grasses and weeds after the initial planting? Was it a lot of hands-on work, or does it settle down with time?
During the first two seasons, maintenance was quite hands-on. Regular weeding was essential, especially to keep invasive grasses and weeds from crowding out new plants. Mulching helped suppress unwanted growth, but manual removal was still needed. As native plants established deeper roots, the maintenance gradually decreased, making it much less labor-intensive over time.
I noticed Alex dealt with heavy clay soil and drainage issues. Did the case study mention if any soil amendments or specific strategies were most effective for improving drainage before planting, especially on a limited $1,000 budget?
The case study explains that Alex focused on improving drainage by mixing in compost and coarse sand to break up the clay. Instead of expensive amendments, Alex used locally sourced organic matter and created raised beds in some areas, which helped water move through the soil more efficiently without exceeding the $1,000 budget.
I’m curious how the $1,000 budget was allocated across things like plants, soil amendments, and any hardscaping. Was there anything Alex wished they hadn’t spent money on in the first year?
The $1,000 budget was mainly used for native butterfly-friendly plants (about $500), soil improvements and compost ($200), and simple hardscaping like stepping stones and a small water feature ($300). Alex mentioned that splurging on decorative garden edging wasn’t necessary in the first year and, in hindsight, would have allocated more funds to plant diversity instead.
I noticed the backyard only gets full sun on one side and shade from a neighbor’s tree on the other. What kinds of native plants did Alex pick for the shadier spots to still attract butterflies?
Alex chose native shade-tolerant plants like wild ginger, woodland phlox, and violets for the shadier side of the yard. These plants provide both nectar and larval food sources, making them attractive to butterflies even in areas with less sunlight.
After site assessment, how did Alex decide which native plants to start with for both sun and shade areas? I’m also curious if there were any plants that didn’t do well and had to be replaced during the process.
Alex chose native plants by first observing which parts of the backyard received full sun and which areas were mostly shaded throughout the day. For sunny spots, he focused on nectar-rich wildflowers like milkweed and coneflower, while in shade he selected woodland natives such as columbine and ferns. During the first season, a few sun-loving plants in partially shaded areas struggled, so Alex swapped them for more shade-tolerant species, gradually fine-tuning the plant choices based on what thrived.
I also have heavy clay soil in my backyard and poor drainage has been a big hurdle. Can you share more about how Alex specifically improved drainage and prepared the soil before planting?
Alex tackled the drainage issue by first loosening the clay soil with a garden fork and mixing in plenty of organic matter like compost and leaf mold. They also created gentle mounds and shallow swales to help water disperse rather than pool. This prep work ensured the soil could better absorb rain and provided healthier conditions for butterfly-friendly plants.
I noticed Alex had to deal with heavy clay soil and poor drainage. Did the article discuss any specific soil amendments or techniques they found most effective for improving drainage before planting pollinator-friendly species?
Yes, the article mentions that Alex addressed the heavy clay soil and poor drainage by mixing in generous amounts of compost and coarse sand to improve soil structure. They also created raised beds in some areas, which helped excess water drain away from plant roots, making it more suitable for pollinator-friendly species.
I noticed Alex had a budget of $1,000 for the first year. Could you break down what the largest expenses were and whether any cost-saving measures ended up working well?
Alex’s largest expenses were native plants, soil amendments, and garden tools. Plants made up about half the budget, while tools and soil improvements accounted for most of the rest. Cost-saving measures that worked well included sourcing some plants from local plant swaps and reusing old containers instead of buying new ones.