
Introduction: Why a Home Herb Drying Room?
Drying your own herbs at home is a rewarding way to preserve the flavors and aromas of your garden bounty or farmer’s market finds. Whether you’re passionate about culinary herbs, medicinal plants, or fragrant botanicals for teas and crafts, a dedicated home herb drying room offers the control and consistency that kitchen counters and makeshift setups simply can’t match. However, many first-timers make critical mistakes that lead to moldy leaves, faded flavors, or even wasted harvests. Setting up a proper herb drying room requires planning, attention to environmental factors, and an understanding of the unique needs of different herbs. In this guide, we’ll delve into the most common beginner mistakes when launching a home herb drying room and provide practical, actionable advice to ensure you get perfectly preserved herbs every time.
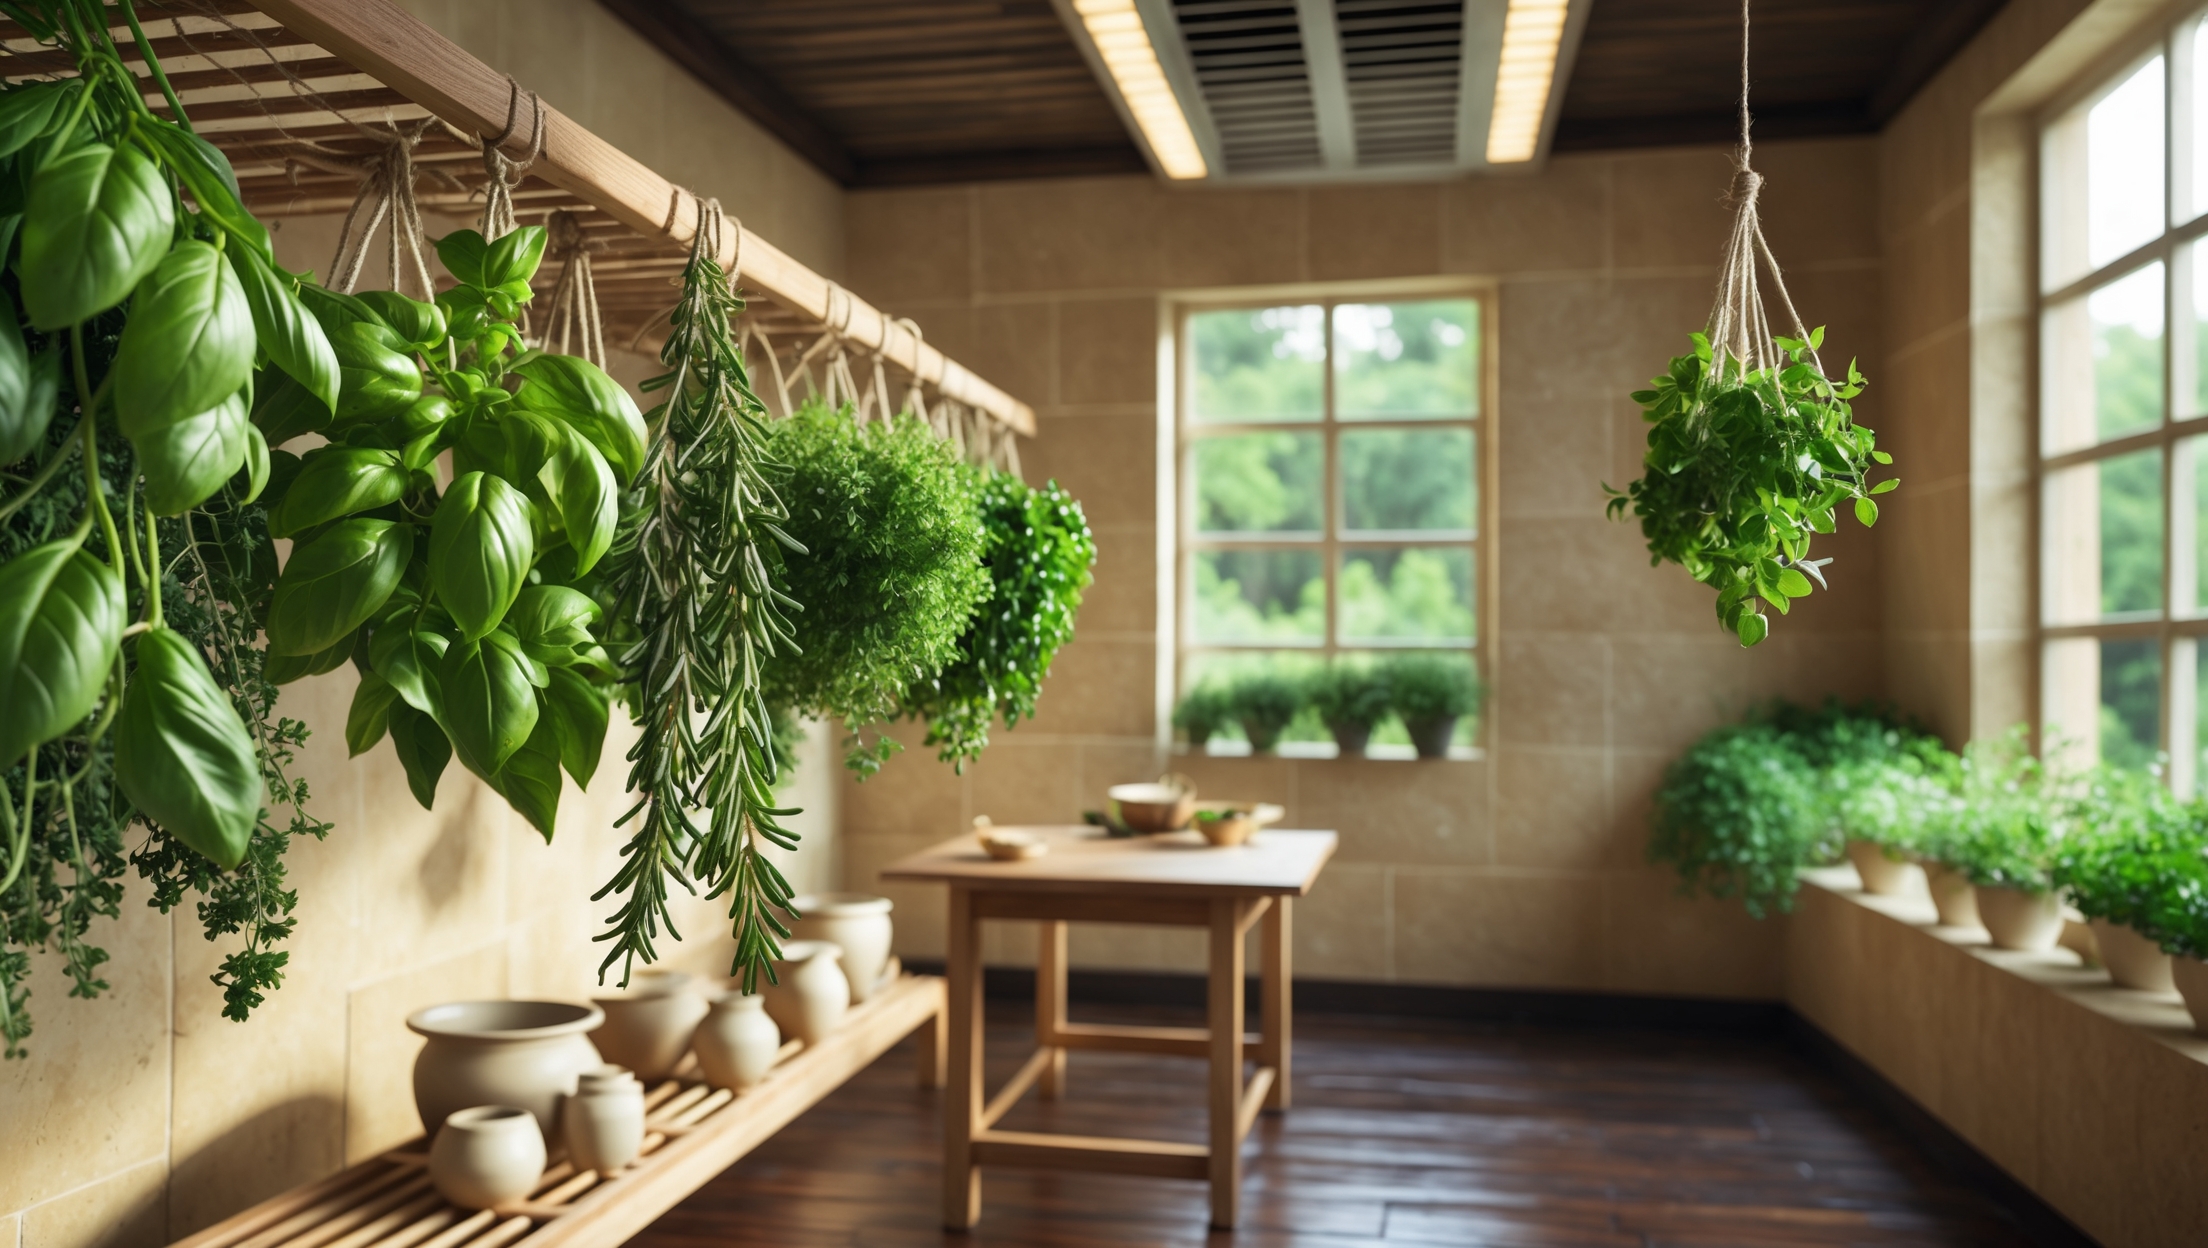
Choosing the Wrong Location
Ignoring Temperature and Light Requirements
One of the most frequent errors is selecting a space that is too warm, too cold, or exposed to direct sunlight. Most herbs require temperatures between 60–70°F (15–21°C) for optimal drying. Spaces that get too hot can cause herbs to dry too quickly, leading to loss of flavor and essential oils. Sunlight will bleach leaves, degrade active compounds, and result in poor-quality dried herbs.
- Tip: Choose a cool, dark, and well-ventilated room—such as a spare closet, unused bathroom, or basement corner away from windows.
- Tip: Avoid attics and garages where temperature and humidity can fluctuate wildly.
Overlooking Airflow and Moisture Risks
Poor air circulation is a recipe for disaster, as it encourages mold growth and uneven drying. Similarly, high humidity can result in limp, musty herbs that are unsafe to consume.
- Tip: Select a space with access to cross-ventilation or install a small fan for gentle air movement. Never aim the fan directly at the herbs.
- Tip: Use a hygrometer to monitor humidity; aim for 45–55% relative humidity for most herbs.
Improper Preparation of Herbs
Washing Mistakes
Some beginners skip washing, which can leave behind dirt, insects, or garden chemicals. Others overwash, soaking tender leaves and encouraging rot during drying.
- Tip: Rinse herbs gently under cool water only if necessary, then shake off excess moisture and pat dry carefully with towels.
- Tip: Never place dripping-wet herbs in the drying room. Surface moisture is the enemy of successful drying.
Harvesting at the Wrong Time
Harvesting herbs too late in the day, after rainfall, or after flowering can result in diminished oils and muted flavors.
- Tip: Harvest in the early morning after dew has evaporated but before the sun is too strong.
- Tip: Pick before flowering for the most potent leaves (except for seeds, which require flowering and drying).
Poor Drying Setups
Overcrowding
Stuffing too many herbs in a small space or bundling them too tightly prevents air from reaching all surfaces, increasing the risk of mold and uneven drying.
- Tip: Space bundles at least several inches apart on racks or lines. Avoid large, thick bundles.
- Tip: For leafy herbs, use mesh drying racks or trays in a single layer for optimal airflow.
Using Non-Food-Safe Materials
Some new herb dryers use old newspapers, plastic bags, or painted wire, which can leach chemicals or transfer unwanted odors to the herbs.
- Tip: Use food-grade mesh, uncoated natural fibers (like cotton or hemp twine), and stainless steel or untreated wood for racks and hangers.
- Tip: Avoid any materials with paint, varnish, or strong odors.
Neglecting Environmental Control
Humidity Problems
High humidity is the enemy of herb drying. Many beginners don’t realize how quickly rising humidity can cause mold or prolonged drying times.
- Tip: Use a small dehumidifier in high-humidity climates or during the summer months.
- Tip: If the room is too dry (below 30% RH), herbs may lose aroma and color. Use a shallow pan of water to add minimal moisture if needed.
Ignoring Air Exchange
Sealing the room too tightly in an effort to keep out dust can trap moisture and stale air, undermining the drying process.
- Tip: Allow for periodic air exchange by cracking a window or using a fan with an outside vent.
Poor Monitoring and Timing
Not Checking Regularly
It’s tempting to hang up your herbs and forget about them for a week, but this can lead to disaster if mold or over-drying occurs.
- Tip: Check herbs daily for signs of mold, uneven drying, or loss of aroma. Adjust airflow or remove fully dried bundles promptly.
Improper Drying Duration
Guessing at drying times is a classic mistake. Different herbs and environmental conditions require different durations.
- Tip: Most leafy herbs take 5–10 days. Flowers and seeds may require up to two weeks. Stems should snap cleanly when bent, and leaves should crumble easily but retain color.
Storing Dried Herbs Incorrectly
Using the Wrong Containers
Plastic bags, unsealed jars, or reused food containers can let in air, moisture, or odors, compromising your hard work.
- Tip: Store dried herbs in glass jars with airtight seals, ceramic canisters, or metal tins lined with food-safe material.
- Tip: Avoid clear containers if they will be exposed to light; sunlight fades herbs quickly.
Forgetting to Label and Date
It’s easy to forget which jar contains which herb—especially after a few months.
- Tip: Label each container with the herb name and drying date. Use painter’s tape or removable labels so you can reuse jars next season.
Not Cleaning and Maintaining the Drying Room
Skipping Post-Harvest Cleanup
Herb fragments, dust, and pollen can build up, attracting pests or contaminating future batches.
- Tip: Thoroughly sweep and wipe down surfaces, racks, and fans after each drying cycle. Inspect for signs of mold or insects.
Neglecting Equipment Checks
Fans, dehumidifiers, and humidity monitors can fail over time, leading to unnoticed problems.
- Tip: Test and clean all equipment before every use. Replace batteries and filters as needed.
Special Considerations for Different Herbs
Woody vs. Leafy Herbs
Woody herbs like rosemary and thyme are more forgiving and dry well in bundles, while leafy herbs (basil, mint, parsley) require extra care to prevent wilting.
- Tip: For leafy herbs, consider using mesh trays or screens instead of bundling. Turn leaves midway through drying for even results.
Flowers and Seeds
Drying edible flowers (like chamomile or calendula) and seeds (like coriander or dill) requires gentler airflow and more frequent checks.
- Tip: Use a fine mesh or cheesecloth to catch small petals or seeds as they dry and fall.
Final Quality Check
Testing for Proper Dryness
Don’t rely on guesswork. Herbs must be fully dry to avoid spoilage in storage.
- Tip: Leaves should crumble between your fingers; stems should snap, not bend. Seeds should be hard and rattle when shaken in a jar.
- Tip: If in doubt, dry for an extra day or two—slightly overdried herbs are better than risking mold.
Conclusion: Enjoying Your Perfectly Dried Herbs
Embarking on the journey of setting up a dedicated home herb drying room can be one of the most satisfying projects for any culinary enthusiast, herbalist, or home gardener. By recognizing and avoiding these common beginner mistakes—from choosing the right location and preparing herbs properly to maintaining the ideal drying environment and storing your harvest with care—you’ll ensure that your dried herbs retain their maximum flavor, color, and potency. Not only will you enjoy better-tasting meals and more aromatic teas, but you’ll also have the confidence that your preserved herbs are safe and free from contaminants.
Remember, the key to success lies in attention to detail at every stage: monitor temperature and humidity, provide adequate airflow, and never rush the process. With a little patience and regular maintenance, your home herb drying room will become an invaluable asset, allowing you to savor the essence of your garden all year round. Happy drying!
How long does it usually take for herbs to dry in a properly set up room with the right temperature and airflow? I want to plan my harvest around the drying time.
In a well-prepared drying room with good airflow and temperatures around 60 to 70 degrees Fahrenheit, most herbs take about 1 to 2 weeks to dry thoroughly. Thicker herbs might need closer to two weeks, while delicate ones can finish sooner. Checking for crispness in the stems is a good way to tell they are ready.
The article says not to point fans directly at the herbs. Why is that, and how close should the fan be to provide good airflow without risking damage or uneven drying?
Pointing fans directly at the herbs can cause them to dry too quickly or unevenly, which may affect their flavor, color, and potency. It can also blow leaves off delicate herbs. Position the fan so it circulates air gently around the room rather than right at the plants. Placing the fan a few feet away and angling it toward a wall or the room center usually works best.
You mention avoiding attics and garages because of temperature and humidity fluctuations. Are there any specific signs or measurements I should look for to know if a room is truly stable enough before using it for herb drying?
To check if a room is stable enough, use a thermometer and hygrometer to monitor temperature and humidity for at least a week. Look for readings that stay consistently between 60–70°F and 45–55% humidity. Watch for sudden changes or big swings throughout the day—these are red flags that the environment may not be stable enough for drying herbs.
Could you clarify what to do if the only available space for a drying room in my house is occasionally exposed to indirect light, like a basement with small windows? Would blackout curtains be enough to protect the herbs, or do I need something more?
If your drying space gets occasional indirect light, blackout curtains are usually a good solution to keep herbs protected from light exposure. Just make sure they fit snugly and block out all light, especially during the drying process. You can also use thick cardboard or heavy fabric as an extra layer if needed to ensure complete darkness.
Do you have any recommendations for affordable hygrometers or easy ways to control humidity if my space tends to fluctuate above that 55 percent threshold you mentioned?
For affordable hygrometers, look for digital models from brands like ThermoPro or AcuRite, which usually cost under $20 and are reliable for home use. To control humidity, you can use a small dehumidifier or moisture-absorbing products like silica gel or DampRid if a dehumidifier is too costly. Regularly checking your hygrometer lets you know when to adjust airflow or use these solutions.
I’m wondering if there are any budget-friendly ways to improve ventilation in a small closet without installing a permanent fan. Would just opening the door periodically be enough?
Opening the closet door regularly can help improve airflow, but it’s not always enough for proper ventilation, especially if humidity builds up. You could try using a small, portable desk fan placed near the open door to increase air movement without any permanent installation. Even propping the door open with a box or wedge can help fresh air circulate more consistently.
If I only have a garage or attic available and the temperatures fluctuate a lot, are there affordable ways to stabilize the environment, or should I really hold out for a better spot before setting up a drying room?
You can make a garage or attic workable by using fans for air movement, dehumidifiers to control moisture, and blackout curtains or insulation to help regulate temperature. These are budget-friendly solutions, but if extreme temperature swings persist, it may impact herb quality. In that case, waiting for a better space might be wiser.
You mention using a hygrometer to monitor humidity levels. Can you recommend an affordable type or brand for beginners, and should I consider getting a dehumidifier if my home tends to be on the humid side?
For beginners, digital hygrometers from brands like ThermoPro or AcuRite are reliable and usually cost under $20. If your home is often humid, a small dehumidifier can definitely help maintain ideal drying conditions and prevent mold. Start with a basic model and monitor your room’s humidity to find the right balance.
How long does it typically take to fully dry herbs in a home drying room with these conditions, and how do you know for sure when they’re actually done?
Most herbs take between 7 to 14 days to fully dry in a home drying room set up according to the article’s recommendations. You’ll know the herbs are done when the leaves feel crisp and crumble easily between your fingers, and the stems snap rather than bend.
You said to avoid attics and garages because of temperature swings, but what if that’s my only available space? Are there affordable ways to manage those conditions and make it work?
If an attic or garage is your only option, you can make it work by insulating the space to reduce temperature swings and using a small heater or air conditioner to regulate climate. Adding a portable dehumidifier and a fan can help maintain air flow and control humidity affordably. Just monitor conditions regularly to keep herbs drying evenly.
The article mentions not pointing a fan directly at the herbs. Could you elaborate on how to position fans for proper airflow, especially in a closet space where there’s not a lot of room to work with?
For a closet space, aim to position fans so they circulate air around the room without blowing directly onto the herbs. Place a small oscillating fan on the floor or a shelf, angling it toward a wall or the ceiling. This creates gentle, indirect airflow that prevents mold but avoids drying herbs too quickly or unevenly.
Could you clarify how often I should check on my herbs during the drying process to avoid mold and ensure proper ventilation, especially in a space like a basement corner?
For a basement corner drying room, check your herbs at least once daily. This lets you monitor for mold and adjust airflow if needed. Make sure to feel the herbs and look for any dampness or musty smell. Open windows or use a fan briefly each day to improve ventilation, especially if the space feels humid.
If my only available space is a garage, are there specific modifications I could make to control temperature and humidity better, or is it just too risky even with added equipment?
Using a garage can work if you take extra steps to control the environment. Insulate the space to help maintain stable temperatures, add a dehumidifier and a small heater or air conditioner as needed, and use fans for airflow. Monitor temperature and humidity closely with meters. While it takes effort, good equipment and monitoring can make a garage suitable for drying herbs.
When choosing between a basement corner and an unused bathroom for a drying space, are there specific pros or cons to consider regarding airflow or moisture control?
A basement corner may have less airflow and higher humidity, which can slow drying and increase mold risk. An unused bathroom often allows better moisture control and ventilation if you use an exhaust fan or open windows, but you should keep humidity in check. Prioritize whichever space offers consistent airflow and lower moisture levels.
How do you handle drying multiple types of herbs with different moisture levels in the same room without risking mold or uneven drying?
To dry multiple herbs with different moisture levels together, group herbs with similar thickness and moisture content. Hang or spread them out with enough space for air circulation. Monitor each type closely and remove those that dry faster to prevent mold. You can also use mesh racks or trays to separate herbs and make it easier to check and rotate them as needed.
Could you clarify what to do if your only available space is a bit above the recommended 70°F? Are there effective ways to keep temperatures down without investing in an expensive cooling system?
If your space runs warmer than 70°F, try increasing airflow with fans or slightly opening a window during cooler parts of the day. Using blackout curtains or reflective materials can also help block heat from sunlight. Drying herbs in smaller batches can further reduce overheating risk.
The article says to avoid attics and garages because of temperature swings, but would an insulated garage with temperature control work, or should I stick to spaces like closets or basements?
An insulated garage with reliable temperature control can work well for drying herbs, as long as you can keep both temperature and humidity stable. Just make sure your setup avoids direct sunlight and drafts. If you can maintain consistent conditions, your garage is a good option.
Is there a particular reason why attics and garages are riskier than basements for drying herbs? I was considering my garage, but now I’m wondering what specific problems I might run into.
Attics and garages are often riskier because they tend to have more temperature fluctuations and less consistent humidity control compared to basements. Garages can get too hot or too cold, which may degrade herb quality or encourage mold. Basements usually maintain steadier conditions, making it easier to control moisture and temperature.
You mention that direct airflow from a fan shouldn’t hit the herbs directly. Can you suggest how to best position the fan in a small closet setup so that air still circulates properly without damaging the herbs?
For a small closet, place the fan on the floor or a low shelf, facing away from the hanging herbs or toward a wall. This way, the air bounces around and gently circulates without blowing directly onto the herbs. You can also use an oscillating fan on a low setting to keep airflow indirect and even throughout the space.
You mentioned basements as a good option if they are away from windows, but mine tends to be damp. What would you recommend for keeping humidity levels in check in a naturally moist basement?
A damp basement can make drying herbs tricky, but you can manage humidity by using a dehumidifier to keep the air dry. Also, promote airflow with fans and avoid drying herbs directly against walls. Regularly check humidity with a hygrometer and aim for 30–50% for best results.
When you mention using a basement corner for a drying room, is there any concern with typical basement dampness affecting the final product even if you use a fan and monitor humidity?
Basement dampness can still be an issue, even with a fan and humidity monitoring. Basements often have higher moisture levels, which can slow drying and encourage mold. Make sure the area is well-ventilated, use a dehumidifier if needed, and check humidity regularly to keep it below 60% for best results.
If I set up my herb drying room in a basement corner as suggested, do I need to worry about the risk of mold more than I would in a different room, since basements can be damp?
Yes, basements can be more prone to dampness, which increases the risk of mold when drying herbs. To reduce this risk, make sure your basement drying room is well-ventilated, use a dehumidifier if necessary, and regularly monitor humidity levels to keep them below 60 percent.
You mentioned that makeshift setups often don’t work as well—are there any beginner-friendly signs to watch for that my drying room isn’t ventilated enough before mold becomes a big issue?
Absolutely, there are a few early warning signs of poor ventilation. If you notice lingering damp smells, condensation on walls or windows, or slow, uneven drying of your herbs, these can all indicate that airflow isn’t sufficient. Addressing these issues quickly—like adjusting vents or adding a small fan—can help prevent mold before it starts.
I see that airflow is really important for preventing mold. Is there a particular type of fan you recommend for smaller rooms, and how far away should the herbs be from the fan so they don’t dry out unevenly?
For smaller rooms, an oscillating fan on a low setting works well because it circulates air gently without blowing directly on the herbs. Place the fan several feet away or off to the side, ensuring the airflow moves around the room rather than hitting the herbs directly. This helps prevent uneven drying and reduces the risk of herbs drying too quickly on one side.
Once the herbs are dried using these tips, what’s the best way to store them so they keep their flavor and don’t pick up moisture again?
After your herbs are fully dried, store them in airtight containers such as glass jars with tight-fitting lids. Keep the jars in a cool, dark place away from sunlight and moisture. Avoid plastic bags or containers that can let in air. Label the jars with the herb name and date so you can use the freshest ones first.
Is it worth investing in special racks or drying equipment right away, or can I start with just basic supplies like string and hooks in a closet for my first try?
You can definitely start with basic supplies like string and hooks in a closet for your first try. Specialized racks and equipment are helpful for larger batches or long-term use, but for beginners, simple setups work well and let you learn the process before investing more.
You mention avoiding attics and garages because of temperature and humidity swings, but what about using a windowless laundry room? Would running a dehumidifier in there work for herb drying?
A windowless laundry room can work for herb drying, especially since it tends to be more insulated from outdoor weather changes. Running a dehumidifier is a good idea, as it helps maintain stable humidity levels, which is important for drying herbs evenly and preventing mold. Just be sure to monitor both temperature and humidity, and try to keep airflow steady by occasionally opening the door or using a small fan.
You mentioned using a cool, dark, and well-ventilated room, but I only have a small closet or a shared basement area available. Would using a closet be okay if I leave the door slightly open and set up a small fan, or will that not provide enough airflow?
Using a closet can work if you’re careful with airflow and humidity. Leaving the door slightly open and adding a small fan will improve ventilation, but check regularly for any musty smell or dampness. Make sure the herbs aren’t packed too tightly and rotate them if possible to promote even drying.
You mention avoiding areas with temperature swings like garages and attics—if my only option is a room that isn’t temperature controlled, are there any low-cost tricks for stabilizing the temperature enough for herb drying?
If you need to use a room without temperature control, try insulating the space with weather stripping or heavy curtains to reduce temperature swings. Placing water jugs inside can help buffer temperature changes, and using a simple box fan or vent can improve air circulation, which also helps minimize extreme fluctuations.
How can I tell if certain herbs need different drying setups within the same room? For example, should basil and rosemary be hung in separate spots, or can they both go together if the temperature and airflow are right?
Some herbs, like basil, are more delicate and can bruise or lose flavor if dried too fast or in too much heat, while sturdier herbs like rosemary are more forgiving. If your room has even temperature and airflow, you can hang both together, but keep softer herbs like basil in slightly shadier, less breezy areas if possible to preserve their quality. Grouping similar-textured herbs together often works best.
Once the herbs are dry, what’s the best way to make sure they stay flavorful in storage, especially if my kitchen tends to get warm and sunny during the day?
To keep your dried herbs flavorful, store them in airtight containers away from light and heat. Since your kitchen is warm and sunny, use dark glass jars or opaque tins and keep them in a cool cupboard or pantry. Avoid clear jars on countertops to prevent flavor loss.
You mention avoiding attics and garages because of temperature swings, but what about using a finished basement where the temperature is generally stable but humidity can get a bit high in summer? Would a dehumidifier be enough to keep things in the ideal range?
A finished basement can work well for herb drying if you manage the humidity. Using a dehumidifier is a good solution—just monitor the humidity regularly and aim to keep it between 45% and 55%. This will help prevent mold and ensure good drying conditions.
You mention avoiding attics and garages because of wild temperature swings, but if those are my only options, are there ways to stabilize the environment enough to still have a decent drying setup?
If the attic or garage are your only choices, you can improve conditions by using a small space heater or portable air conditioner with a thermostat to manage temperature swings. Adding a dehumidifier or humidifier can help control humidity. Make sure you monitor conditions closely with a thermometer and hygrometer to keep things as steady as possible.
I saw you mentioned using a fan for airflow, but how do you set it up so it doesn’t blow directly on the herbs? Do you have any tips for positioning the fan or choosing the right size?
To avoid blowing air directly on your herbs, place the fan so it faces a wall or the ceiling, which helps circulate air gently around the room. Choose a fan with adjustable speed—oscillating fans on a low setting work well. Make sure the airflow feels indirect and soft across the drying area.
How long does it usually take for herbs to fully dry if I’m following the temperature and humidity guidelines you mentioned? I’m trying to plan my harvest and don’t want to risk them getting moldy.
If you maintain the recommended temperature and humidity, most herbs will dry completely in about 1 to 2 weeks. Thicker or woodier herbs may take closer to 2 weeks, while delicate leaves can finish in 5 to 7 days. Check daily to ensure they’re crisp and not at risk of mold.
What would be the first signs of moisture problems or mold developing in a new drying room, and what immediate steps should I take if I notice these issues early on?
Early signs of moisture problems or mold in a drying room include musty odors, visible condensation on surfaces, damp spots, or fuzzy white, green, or black patches on herbs or walls. If you notice any of these, immediately improve ventilation, use a dehumidifier, remove affected herbs, and clean surfaces with a mild bleach solution to stop mold from spreading.
If I’m drying different types of herbs at once, like basil and rosemary, do I need to separate them in different areas or pay closer attention to airflow between bunches?
It’s best to separate different types of herbs, especially if they have strong aromas like rosemary, to prevent flavors from mixing. Also, keep good airflow between bunches to help them dry evenly and reduce the risk of mold. Using racks or hanging them with space in between works well.
You mention that most herbs dry best at 60–70°F in a cool, dark, and well-ventilated space. If my basement only stays around 55°F, will that be too cold, or will it just slow down the drying process?
A basement at 55°F isn’t too cold for drying herbs, but the process will be a bit slower than at 60–70°F. Just keep an eye on moisture and airflow to prevent mold, and expect it to take a few extra days for your herbs to dry fully.
You mention using a cool, dark, and well-ventilated room for herb drying, but I only have access to a basement that occasionally gets a bit damp in summer. Would a dehumidifier be enough to manage humidity, or is that still a risky environment?
A dehumidifier can help make your basement suitable for drying herbs by controlling excess moisture, which reduces the risk of mold. Make sure to monitor humidity levels, keeping them ideally between 40% and 60%. Also, ensure good air circulation and check your herbs regularly for any signs of dampness or spoilage.
For someone with limited space, like just a small closet, how do you recommend setting up airflow so the herbs dry evenly without a risk of developing mold?
In a small closet, use a compact oscillating fan set on low to gently circulate air without blowing directly on the herbs. Crack the closet door or install a vent to let out humid air. Avoid overcrowding and space herbs apart so air moves freely around each bundle.
You mentioned that basements can be good locations for herb drying rooms, but mine tends to get damp sometimes. Would running a dehumidifier be enough to control moisture, or should I consider a different space?
Running a dehumidifier in your basement can help control moisture and make it suitable for drying herbs, as long as you monitor the humidity levels regularly. Ideally, keep the humidity between 45% and 55%. If the space remains persistently damp despite using a dehumidifier, it may be better to try a different, drier area in your home.
You mention avoiding garages and attics due to temperature swings, but are there any simple ways to insulate or adapt these spaces to make them suitable for herb drying, or should they be avoided entirely?
Garages and attics can be adapted for herb drying if you address the main issues: temperature swings and humidity. You can insulate the space using foam panels or fiberglass insulation, add a small dehumidifier or fan for airflow, and use blackout curtains to limit sunlight. Monitoring temperature and humidity with basic sensors will help maintain the right conditions. While not ideal, with these adjustments, such spaces can work for drying herbs.
I tried drying basil in my basement but it ended up tasting musty. Besides monitoring humidity, are there any quick fixes to improve airflow in a basement setup without doing a full renovation?
To improve airflow in your basement without major renovations, you can use a portable oscillating fan or set up small clip-on fans to circulate air around the herbs. Make sure your drying racks aren’t crowded, and prop open any basement windows or doors when possible to encourage fresh air movement.
The article mentions avoiding spaces like attics and garages due to temperature and humidity fluctuations. If those are the only rooms I can use, are there specific modifications or equipment I could add to make them work for herb drying?
If you need to use an attic or garage, try to control temperature and humidity as much as possible. Use a dehumidifier to keep moisture low and a small heater or fan to stabilize temperature. Insulating the space and sealing gaps can also help prevent sudden weather changes. Monitor conditions with a hygrometer and thermometer to keep things consistent for the herbs.
When you mention targeting a humidity of 45–55% using a hygrometer, how frequently should I be checking and adjusting the humidity levels, especially if I’m drying several types of herbs at once?
When drying several types of herbs at once, it’s best to check the humidity with your hygrometer at least twice a day—once in the morning and once in the evening. Herbs can release moisture as they dry, so monitor regularly and adjust ventilation or use a dehumidifier as needed to keep levels steady.
You mention that direct sunlight can degrade herbs, but what about indirect light from a shaded window—does that still risk fading flavor or is it mainly direct sun that’s harmful?
Indirect light from a shaded window is less harsh than direct sunlight, but it can still cause some loss of flavor and color in your herbs over time. For best results, keep your drying area in a cool, dark place to preserve the herbs’ quality as much as possible.
I noticed you recommend avoiding attics and garages because of temperature swings, but what about using a finished basement with a small window? Are occasional drafts an issue for herb drying?
A finished basement with a small window can work well for drying herbs, as basements often have stable temperatures. Occasional drafts aren’t a big problem if they don’t create strong air currents, which could cause uneven drying. Just make sure humidity stays in check and air circulates gently.
You mentioned avoiding sunlight and keeping herbs in a cool, dark place. My spare closet isn’t totally dark during the day because of some light from a hallway window—will that little bit of indirect light really make a big difference?
A small amount of indirect light from a hallway window shouldn’t ruin your herbs, but it’s best to minimize light as much as possible. Even low levels of light can slightly reduce the color and potency of dried herbs. If you can, hang a dark curtain or place a towel over the closet door to block out extra light.
If our only available space is a basement that sometimes gets damp, what are the best ways to keep the humidity within the 45–55% range you mentioned for safe herb drying?
To control humidity in a damp basement, consider using a dehumidifier set to maintain 45–55% humidity. Place a hygrometer in the room to monitor levels. Improve air circulation with a fan, and avoid hanging herbs too close together to help moisture escape. Sealing cracks or leaks can also help prevent excess dampness.
Are there affordable alternatives to a hygrometer for keeping track of humidity, or is it really essential for preventing mold when setting up a first-time drying room?
A hygrometer is the most reliable way to monitor humidity and prevent mold, but if you’re on a budget, you can try using inexpensive humidity indicator cards. However, these aren’t as precise, so you’ll need to be extra vigilant for signs of mold or dampness. For best results and peace of mind, investing in a basic digital hygrometer is strongly recommended.
If I want to use a spare closet for drying herbs but it’s near the bathroom and sometimes gets humid, is that still okay? Should I invest in a dehumidifier or just monitor with a hygrometer?
Using a closet near a bathroom can be tricky since humidity from showers can affect your herbs. It’s best to monitor the humidity with a hygrometer. If levels often rise above 60%, a small dehumidifier will help maintain the ideal drying conditions and prevent mold.
The article mentions using a hygrometer to monitor humidity, but is there a budget-friendly type or model you suggest for beginners just starting out?
For beginners, a basic digital hygrometer is usually sufficient and quite affordable. Look for models under $15 from brands like ThermoPro or AcuRite. These simple units provide clear humidity and temperature readings, making them perfect for monitoring your drying room without breaking the bank.
If my only available space is a windowless bathroom, what are the best strategies to prevent excess moisture from showers affecting the drying process? Would simply keeping the door closed and running a fan be enough?
Using a windowless bathroom for drying herbs can be tricky because showers add a lot of moisture. It’s best to avoid using the bathroom for showers while drying herbs. Keep the door closed to limit outside humidity, but also run a dehumidifier or exhaust fan to actively remove moisture. A regular fan alone might not be enough unless it vents air out of the room. Always monitor humidity levels and aim to keep them below 60% for proper drying.
You mention using a hygrometer to monitor humidity, but what about fluctuations in temperature—do I need a separate device to track that, or are there affordable gadgets that can handle both?
You don’t need separate devices—many digital hygrometers also measure temperature. Look for models labeled as ‘thermo-hygrometers.’ These are affordable, widely available, and will let you track both humidity and temperature in your drying room at the same time.
I noticed the article suggests avoiding attics and garages due to fluctuating temperatures. If I only have access to a garage, are there any affordable modifications or equipment that could help stabilize the environment for herb drying?
If you can only use a garage, try insulating the space with weather stripping or foam panels to help regulate temperature. Use a basic heater or portable air conditioner, paired with a thermostat, to maintain steady conditions. Adding a small dehumidifier can also help control humidity affordably.
You mentioned using a hygrometer to keep humidity around 45–55 percent. Is there a type or brand you recommend for beginners, or will any basic one do the job?
Most basic digital hygrometers will work well for beginners, as long as they’re accurate and easy to read. Look for one with a clear display and, if possible, one that also measures temperature. You don’t need anything fancy—just make sure to calibrate it before use for best results.
You mentioned aiming for humidity between 45–55 percent. If it gets more humid in my basement during rainy weeks, what’s the best affordable way to lower the humidity just for the drying period?
Using a small dehumidifier is the most effective and affordable solution for lowering humidity in your basement during the drying period. You can also improve airflow with a fan and keep windows closed during rainy spells to prevent extra moisture from entering.
You mention using a spare closet or unused bathroom for a drying room, but what should I do if those spaces still have some natural light coming in? Is total darkness necessary, or do blackout curtains work?
Total darkness isn’t absolutely required, but minimizing light exposure is important to preserve the color and potency of your herbs. If your closet or bathroom gets natural light, using blackout curtains or heavy dark fabric over windows or doors is a practical solution. Just make sure air can still circulate for proper drying.
Is it possible to create a decent herb drying setup on a tight budget? The article talks about using well-ventilated rooms and fans, but which upgrades or equipment are actually worth the investment for someone just starting out?
You can absolutely set up a good herb drying space on a budget. Start with a dedicated, clean room and basic fans for airflow. If you want to upgrade, consider a small dehumidifier for better humidity control and mesh drying racks for efficient use of space. These items are affordable and make a noticeable difference in drying quality.
You suggest using a hygrometer, but is there a particular type or feature I should look for when buying one for herb drying rooms? I’ve seen a lot of options online and I’m not sure what’s best.
For drying herbs, choose a digital hygrometer with good accuracy (±2% RH or better), a clear display, and the ability to read both temperature and humidity. Models with high/low memory can also help you monitor fluctuations. Avoid very basic models that lack calibration or clear readings.
You mentioned avoiding direct sunlight and attics or garages due to temperature swings, but what about using a windowless bathroom? Would the leftover moisture from showers be a problem even if I only use the fan and not the vent?
A windowless bathroom can be tricky for drying herbs, mainly because leftover moisture from showers can create a humid environment. Even if you use the fan, without proper ventilation, humidity can linger and cause mold or slow drying. Ideally, choose a dry space with stable airflow and low humidity for best results.
For someone who wants to dry both culinary and medicinal herbs at home, do different herbs need separate spaces, or can they be dried together if the room meets the temperature and ventilation guidelines you described?
You can usually dry both culinary and medicinal herbs together in the same room if it meets the temperature and ventilation guidelines. However, strong-smelling herbs might transfer odors or flavors, so it’s wise to separate those or use mesh bags to keep them distinct while sharing space.
If I don’t have a hygrometer yet, is there a low-cost way to check if my drying space is staying within that 45–55 percent humidity range, or is getting a hygrometer absolutely necessary for beginners?
While a hygrometer is the most accurate and reliable way to monitor humidity, you can try using inexpensive humidity indicator cards or crystals as a temporary solution. However, these methods only give a rough estimate, so investing in a basic hygrometer is highly recommended for consistent and safe drying results.
I’m new to using a hygrometer—if the humidity spikes above 55% overnight, do I need to take immediate action, or is it okay if it fluctuates occasionally during the drying process?
If your humidity goes slightly above 55% overnight, there’s usually no need to panic, as small fluctuations can happen. However, if high humidity persists for more than a few hours or happens repeatedly, it’s best to take action to prevent mold. Try improving ventilation or using a dehumidifier if needed.
How important is it to monitor humidity with a hygrometer every day, or can I just check it once in a while? I’m new to this and not sure how sensitive herbs are to small humidity changes during drying.
It’s important to monitor humidity with a hygrometer daily, especially during the first week of drying. Herbs are quite sensitive to humidity; too much can cause mold, while too little can make them brittle. Regular checks help ensure you adjust ventilation or dehumidifiers as needed for the best results.
How can I tell if my DIY herb drying setup is getting enough airflow? Are there any obvious signs of poor circulation before mold actually appears?
You can check for good airflow by feeling for a gentle, even breeze throughout the drying area and making sure no herbs feel damp or overly humid to the touch. Signs of poor circulation include strong musty smells, overly slow drying, or herbs sticking together. If you notice condensation on walls or drooping, limp herbs, those can be early warnings of insufficient airflow.
When using a fan for air movement in the drying room, how do I determine the right speed or distance to avoid over-drying or causing herbs to blow around?
To prevent over-drying or herbs blowing around, set your fan on a low speed and position it so the airflow is indirect—not blowing directly on the herbs. Place the fan several feet away, just enough to keep air gently moving. Check the herbs regularly; if they move or dry unevenly, adjust the speed or increase the distance.
If I select a cool, dark space but notice that humidity is consistently above 60 percent, is there a budget-friendly way to control moisture without investing in a dehumidifier, or is that really the best option for beginners?
If a dehumidifier is out of your budget, you can try using moisture absorbers like silica gel, calcium chloride, or even rock salt placed in open containers around your drying room. Improving ventilation by cracking a window or using a fan can also help reduce humidity, but a dehumidifier is generally more effective for beginners seeking consistent results.
Could you clarify the best way to monitor and control the humidity in a drying room, especially if I can’t check it daily? Would a basic hygrometer be enough or are there more automated options for small setups?
A basic hygrometer can help you keep track of humidity, but if you can’t check it daily, consider a digital hygrometer with a data logger or remote alerts. There are also small, affordable humidistats and smart sensors that can automate fans or dehumidifiers to maintain ideal levels with minimal hands-on monitoring.
You mention using a hygrometer to monitor humidity. Could you recommend specific types or brands that are reliable but still affordable for beginners?
For beginners, digital hygrometers like the ThermoPro TP50 or the AcuRite Digital Hygrometer are both reliable and budget-friendly. They provide accurate readings and are easy to use. Analog options are available, but digital models usually offer better precision for monitoring your drying room.
For someone new to drying herbs, how can you tell if the room’s temperature and airflow are actually working well for different types of herbs? Are there visible signs that something’s off before it gets really bad?
You can tell your drying room is working well if your herbs dry evenly without turning brown, feeling damp, or developing moldy smells. Watch for wilting, dark spots, or fuzzy growth—these are early signs of poor airflow or high humidity. Crisp, vibrant herbs and a fresh scent mean things are on track.
If my only available space is a small bathroom with a window, how can I block out enough light and still keep the airflow good enough to avoid mold problems?
You can hang a blackout curtain or use thick, dark towels over the window to block out light while still allowing some air through the sides or bottom. Keep the door slightly open or use a small fan to promote airflow and reduce humidity. Just make sure the bathroom stays dry and check your herbs regularly for any signs of mold.
You mention avoiding attics and garages due to temperature fluctuations, but those are the only extra spaces I have. Is it still possible to set up a reliable herb drying room in those areas if I monitor the conditions closely?
Yes, it is possible to use an attic or garage if you closely monitor and control temperature and humidity. Consider using insulation, a dehumidifier, or fans to keep conditions stable. Regularly check temperature and humidity, aiming for around 60°F to 70°F and 50–60% humidity for best results.
I’m curious about choosing the right spot for a drying room. Would an interior closet with no windows work, or would the lack of natural airflow be an issue even with a small fan installed?
An interior closet with no windows can work if you manage airflow and humidity carefully. Using a small fan helps, but make sure air can actually circulate in and out, not just within the space. You might need to crack the door or install a vent to prevent stale, humid air that could cause mold.
After drying, how should I store my herbs to keep them fresh, and is there a way to tell if I’ve dried them properly to avoid wasting my harvest?
Once your herbs are fully dried, store them in airtight containers kept away from light, heat, and moisture to preserve their flavor and potency. To check if they’re dry enough, stems should snap easily rather than bend, and leaves should feel crisp. If there’s any sign of mold or a musty smell, they may not have dried properly and should not be stored.
You mentioned that attics and garages aren’t ideal due to temperature swings. I’m on a budget and those are the only spots I have. Is there any way to safely use them for drying herbs if I make some adjustments?
You can still use your attic or garage if you make some modifications. Try insulating the space with foam board or blankets to reduce temperature swings. Use a small fan for air circulation and consider a dehumidifier to control moisture. Monitor the temperature and humidity regularly to keep them within safe ranges for herb drying.
How long does it usually take for most herbs to fully dry in the environment you describe, and are there signs I should watch for to avoid overdrying or mold?
In a well-ventilated, dark, and humidity-controlled drying room, most herbs are fully dry in 5 to 10 days. Check if leaves feel crisp and stems snap easily to avoid overdrying. To prevent mold, watch for any musty odors or discoloration; herbs should retain their natural color and aroma.
I see you recommend avoiding attics and garages, but what if my basement tends to be a bit damp during the summer? Is there a way to control the humidity or should I pick a totally different room?
A damp basement can make drying herbs tricky, but you can manage humidity with a good dehumidifier and by running a fan for air circulation. Monitor the humidity to keep it under 60%. If it stays too damp despite your efforts, choosing a drier room would be safer to prevent mold.
How important is it to check humidity daily with a hygrometer, or is once or twice a week enough for beginners who are just getting started with drying herbs?
Checking humidity daily with a hygrometer is highly recommended, even for beginners. Herb drying is sensitive to moisture levels, and daily checks help you catch problems like mold or overly dry herbs early. While once or twice a week is better than not checking at all, daily monitoring ensures better results and reduces risk.
After setting up a drying room with proper temperature and airflow, how long should I expect the typical herb to take to dry completely? Do certain herbs have much different drying times or need special attention during the process?
Most common herbs take about 1 to 2 weeks to dry completely in a well-ventilated room kept around 60-70°F with good airflow. Thicker or oilier herbs like rosemary or sage can take a bit longer, while delicate ones like basil or mint might dry faster but need extra care to avoid browning. Always check herbs individually for dryness and adjust time as needed.
Can I combine air drying and using a dehydrator for herbs that are especially prone to mold, or does switching methods halfway cause issues with flavor or quality?
You can safely combine air drying and dehydrator methods for herbs that are prone to mold. Starting with air drying and finishing in a dehydrator helps prevent spoilage and usually doesn’t harm flavor or quality. Just avoid over-drying, and monitor the herbs closely for best results.
When you mention using a hygrometer to keep humidity at 45–55 percent, do you have any recommendations for affordable models that work well in small spaces like closets?
For small spaces like closets, digital hygrometers from brands like ThermoPro or AcuRite are affordable and reliable. They’re compact, usually under $20, and provide accurate humidity readings. Look for models with clear displays and the ability to calibrate if needed.
If my only available space is a small bathroom with a window, what are some practical ways to control temperature and block light exposure during the drying process?
To control temperature in your bathroom, use a small fan for good airflow and open the window slightly if it gets too warm. To block light, hang dark curtains or use blackout film on the window. Make sure the bathroom stays dry, as humidity can slow down the drying process.
You mention using a hygrometer to monitor humidity. Would you recommend a specific type, and is it necessary to invest in a dehumidifier if my basement tends to stay above 60% humidity?
A digital hygrometer is usually best for accuracy and ease of reading. If your basement often stays above 60% humidity, a dehumidifier is definitely recommended to prevent mold and ensure your herbs dry properly. Look for a dehumidifier with adjustable settings so you can maintain ideal conditions.
If I’m trying to dry herbs in a small apartment and only have access to a closet that might not have perfect ventilation, are there any low-budget ways to improve airflow without risking mold?
You can improve airflow in a closet by using a small battery-powered or USB fan placed near the herbs (but not blowing directly on them). Leaving the closet door ajar or slightly open will also help air circulation. Check daily to make sure humidity stays low and rearrange the herbs to promote even drying.
If I want to dry more than one type of herb at a time, do I need to separate them into different rooms or is it enough to just keep some distance between each group in the same space?
You don’t need separate rooms for different herbs, but it is best to keep each type in its own section with some space in between. This helps prevent flavors and aromas from mingling, and also reduces the risk of cross-contamination or uneven drying.
I’m unsure if my basement’s humidity will be a problem. You mentioned using a hygrometer, but what should I do if my readings are higher than 55%? Any affordable solutions to keep moisture in check?
If your basement humidity is above 55%, using a small dehumidifier can help bring it down to the ideal level for drying herbs. Also, improve airflow by running a fan, and consider using moisture absorbers like silica gel packs or damp-rid products as budget-friendly options.
I notice you recommend closets or basement corners over attics and garages due to temperature and humidity fluctuations. Are there any safe modifications I could make to use my garage if it’s my only available space?
You can adapt your garage for herb drying by insulating the space to minimize temperature swings, adding a dehumidifier to control moisture, and using fans for steady airflow. Installing a simple temperature and humidity monitor will help you keep conditions stable and ideal for drying herbs.
You mention using a fan for airflow, but not aiming it directly at the herbs. Could you clarify how far away the fan should be, and what fan settings work best to prevent damage to delicate leaves?
Position the fan several feet away from your herbs, ideally across the room or in a corner, so it circulates air gently without blowing directly on them. Use the lowest setting to create a mild, consistent airflow. This helps prevent delicate leaves from drying too quickly or becoming brittle.
I get that direct sunlight is bad, but what if my only option is a room with a small window? Would blackout curtains be enough to protect the herbs during drying?
Blackout curtains are a good solution if the room has a small window. They will block direct sunlight and help maintain a consistent environment, protecting your herbs from light damage. Just make sure the room stays well-ventilated to avoid mold or moisture issues while drying.
When you mention using a fan for airflow in the drying room, do you have any recommendations on what type or size of fan works best without drying the herbs out too quickly? Is there a specific setup you’ve found effective?
A small oscillating fan or a box fan on a low setting usually works well for herb drying rooms. Place the fan so it circulates air around the room, not directly onto the herbs. This setup promotes gentle airflow and helps prevent herbs from drying out too fast or unevenly.
You mention that direct sunlight can bleach and degrade herbs, but does indirect natural light from a small window pose similar risks, or is that usually fine if the herbs are kept out of the direct sunbeam?
Indirect natural light from a small window is generally safe for drying herbs as long as the herbs are not in the path of direct sunlight. While some light exposure is fine, the main concern is direct sun, which can bleach and degrade herbs. Just make sure your drying area is shaded or filtered from strong sunlight.
You mention that direct sunlight can damage herbs during drying—does indirect, filtered light have a similar effect, or is it safe for the drying process as long as it isn’t direct?
Indirect, filtered light is generally safe for drying herbs and doesn’t cause the same damage as direct sunlight. As long as your herbs are not exposed to harsh, direct rays, their color, flavor, and potency should be well preserved. A room with gentle, indirect light or good airflow is ideal.
You suggest aiming for 45–55% relative humidity, but what happens if the level briefly goes above or below that range? Is there much risk of ruining a batch if conditions fluctuate for a day or two?
Short-term fluctuations outside the 45–55% humidity range typically won’t ruin a batch, especially if it’s just for a day or two. Herbs are pretty resilient, but if humidity stays too high for longer, mold could develop. If it drops too low, herbs may dry too quickly and lose flavor. Try to keep conditions stable, but don’t worry about brief changes.
You mentioned keeping the temperature between 60–70°F for drying herbs. How big of an issue is it if the temperature drops outside that range at night? Do I need to run a space heater or is it ok to let it fluctuate?
A slight dip below 60°F at night usually isn’t a big problem, but consistent low temperatures can slow the drying process and risk mold. If fluctuations are minor and your herbs aren’t staying damp for long, you probably don’t need a space heater. For steady results, aim to keep the room as close to 60–70°F as possible.
What’s the best way to monitor and control humidity in a basic setup? I’m just starting out and wondering if all these tools like hygrometers are necessary for a small batch or if there are simpler methods.
For a small batch, a simple digital hygrometer is really helpful because it gives you accurate readings at a glance and they’re inexpensive. If you prefer a low-tech approach, you can check for dampness by feeling the air and observing the herbs for signs of mold or overdrying, but this is less precise. Even in a basic setup, using at least one hygrometer makes it much easier to maintain the ideal humidity and avoid problems.
When drying different types of herbs at the same time, should I separate them in different rooms or is it okay to dry them together as long as the temperature and humidity are controlled as you suggest?
You can dry different types of herbs together in the same room if you maintain the right temperature and humidity. However, it’s best to keep strong-scented herbs, like mint or rosemary, separate to prevent flavors and aromas from mixing. Use mesh trays or hanging bundles with some space between each type to further minimize mingling.
If space is limited, would you recommend using an unused bathroom or a basement corner as the better option for a herb drying room? I’m concerned about both temperature stability and potential for mold.
Between an unused bathroom and a basement corner, the basement corner is usually better. Basements tend to have more stable temperatures, but you’ll need to ensure good airflow and watch for dampness. Bathrooms often have higher humidity, which increases mold risk. Use a dehumidifier and fans if you choose the basement.
Can you explain more about how to use a hygrometer in the drying room? Do you have recommendations for affordable models or tips on where to place it for the most accurate readings?
A hygrometer helps you monitor humidity in your drying room, which is crucial for good herb drying. Place it at about plant height and away from direct airflow or windows to avoid skewed readings. Affordable digital models from brands like ThermoPro or Govee work well and are commonly available at hardware stores or online.
What’s the best way to tell if my chosen spot is getting too much light, especially since some corners near doors can get a little bit of sunlight during the day? Would blackout curtains be overkill?
A simple way to check if your drying spot gets too much light is to observe it at different times of day and see if sunlight hits the herbs directly. If you notice any bright patches or sunbeams, even for short periods, it’s a sign you need to block the light. Blackout curtains may seem like a lot, but they’re effective if you have persistent sunlight. Alternatively, thick towels or cardboard can work for smaller areas or occasional light.
How big of an investment does it take to set up a basic drying room with proper ventilation and humidity control compared to just using a kitchen counter setup?
Setting up a basic drying room with proper ventilation and humidity control usually costs several hundred dollars or more, depending on the equipment and materials chosen. This includes fans, dehumidifiers, hygrometers, and possibly insulation or shelving. In contrast, using your kitchen counter typically has little to no added cost, but you sacrifice optimal drying conditions and risk quality loss.
You mention avoiding direct sunlight and garages due to temperature fluctuations. Would a windowless bathroom work better than an attic even if the ventilation isn’t perfect, or should I prioritize airflow above all else?
Airflow is more important than the specific room, so prioritize a space where you can create consistent ventilation. While a windowless bathroom is better than an attic with big temperature swings, make sure you can use fans or vents to keep the air moving and prevent mold.
How long does it usually take for most culinary herbs to dry in a closet or unused bathroom with proper ventilation? I’m trying to plan how often I’ll need to check on them.
With good ventilation, most culinary herbs take about 1 to 2 weeks to dry in a closet or unused bathroom. Thinner herbs like thyme or oregano may be ready in 7 days, while thicker ones like basil could take closer to 14 days. Check every few days to monitor progress and prevent over-drying.
Is there a recommended type or size of fan to use for air circulation so it doesn’t dry out delicate herbs too quickly or cause uneven drying?
For delicate herbs, it’s best to use a small oscillating fan set on a low speed. Position it so the air moves gently around the room without blowing directly on the herbs. This helps prevent uneven drying or over-drying sensitive leaves. Make sure the air circulates well but remains gentle.
Could you elaborate on how to safely regulate humidity if my only available space tends to swing above 55%, especially during summer? Are there budget-friendly ways to keep humidity in check besides a dehumidifier?
If your space often goes above 55% humidity, try increasing airflow with fans and opening windows during drier periods. Desiccant materials like silica gel or calcium chloride can also help absorb excess moisture. Hanging herbs with good spacing and drying smaller batches will reduce humidity buildup. These methods are quite budget-friendly and can be surprisingly effective alongside regular monitoring with a hygrometer.
I noticed you advised keeping drying temperatures between 60 and 70°F. What should I do if my house regularly gets above that in the summer? Are there any affordable ways to cool the drying area without setting up an AC?
If your house gets warmer than 70°F, try drying your herbs in the coolest room, ideally with good airflow and out of direct sunlight. You can use a box fan to improve ventilation, and placing bowls of ice in the room may help lower the temperature a bit. Hanging herbs at night, when it’s cooler, can also help preserve their quality.
Could you clarify how sensitive some herbs are to temperature fluctuations? For instance, if my drying room occasionally dips below 60°F, will that significantly affect the quality, or is a small range okay?
Many herbs are fairly forgiving, but sensitive ones like basil, mint, and chives can be affected by significant temperature dips. Occasional drops just below 60°F usually won’t ruin your herbs, but consistent or big swings can slow drying and risk mold. Aim for stable temperatures between 60°F and 70°F for best results.
You mention aiming for 45–55% relative humidity for optimal drying. What is the best way to keep humidity in that range during especially humid summer months without investing in an expensive dehumidifier?
To control humidity without a pricey dehumidifier, try using moisture-absorbing products like silica gel, calcium chloride, or DampRid in your drying room. Improve ventilation with fans and open windows during drier times of day. Also, avoid overcrowding the room, as better airflow helps maintain proper humidity levels.
I’m curious about drying different types of herbs at the same time. Do some herbs need lower temperatures or less humidity than others, or can I use the same settings for everything?
Different herbs can have varying needs when it comes to drying. Delicate herbs like basil and mint usually prefer lower temperatures and less airflow, while sturdier ones like rosemary and thyme can handle slightly higher heat and more air movement. If possible, separate herbs by their requirements or check on the most sensitive ones to set your drying room’s settings accordingly.
How long should I expect the drying process to take when using a cool, dark, well-ventilated closet as you suggested, and are there visual signs I should watch for to know when the herbs are truly finished?
Drying herbs in a cool, dark, well-ventilated closet usually takes 1 to 2 weeks, depending on the type of herb and humidity levels. You’ll know they’re ready when the leaves feel crisp and crumble easily between your fingers, and stems snap instead of bending.
If I only have a laundry room available and it sometimes gets a bit humid, what adjustments would you recommend to control moisture and prevent mold during herb drying there?
Since laundry rooms can be humid, consider using a dehumidifier to keep moisture levels down. Make sure the herbs have good airflow by using a small fan. Hang them with space between each bunch, and check regularly for any signs of mold. Try to keep the room as cool and dry as possible during the drying process.
You mentioned the ideal temperature range is 60 to 70°F. What’s the best way to maintain that if my only available space is a basement that sometimes gets chilly?
If your basement gets chilly, consider using a small space heater with a thermostat to help maintain the 60 to 70°F range. Make sure the heater is safe for indoor use and avoid placing it too close to the herbs. Insulating the room or using weather stripping on doors and windows can also help hold in warmth.
Could you give more details about what specific types of fans are best for gentle airflow? I’m on a tight budget and want to make sure I buy the right equipment for drying herbs.
For gentle airflow on a budget, box fans or basic oscillating fans work well. Place them so air moves around your herbs without blowing directly on them. Avoid high-velocity fans, as they can dry herbs too quickly. Look for fans with adjustable speeds so you can control the airflow as needed.
I’m worried about airflow in my small closet. If installing a fan is not possible, do you have any tips for increasing ventilation without risking contamination or disturbing the herbs too much?
If you can’t install a fan, try leaving the closet door slightly open or cracking it for short intervals to let fresh air circulate. Use a mesh screen over the opening to keep out dust and pests. Placing drying herbs on open racks and rotating them gently every day also helps promote even drying and airflow.
I’m thinking about setting up my drying room in a basement corner like you suggested, but mine still gets a little damp at times. Do you have advice for budget-friendly ways to control moisture in a small space?
To control moisture in a damp basement corner, try using a small, inexpensive dehumidifier or moisture-absorbing products like silica gel or calcium chloride. Make sure your herbs are elevated off the floor for airflow, and open a window or use a small fan occasionally to circulate air if possible.
You mention using a hygrometer to check humidity levels, but what should I do if the humidity keeps going above 55% even with a fan running? Are there budget-friendly ways to control it without a dehumidifier?
If your humidity stays above 55% with fans, try improving air flow by opening windows or doors for short periods, especially when outdoor air is drier. Using moisture absorbers like silica gel, rock salt, or calcium chloride in containers can help absorb excess humidity and are affordable options. Just remember to replace or dry them out regularly for best results.
If I accidentally let my herbs get exposed to sunlight for a few hours, are they still safe to use or should I toss them out because of lost flavor and quality?
Your herbs are still safe to use if they were exposed to sunlight for a few hours. While some flavor and color may be diminished due to the light exposure, they won’t be harmful. Just check for any signs of spoilage like mold or a musty smell before using them.
You mentioned avoiding attics and garages because of temperature and humidity fluctuations. Would using a portable dehumidifier in those spaces make them more suitable for drying herbs, or is it still too risky?
A portable dehumidifier can help control humidity in attics or garages, making them more suitable for herb drying. However, these spaces often have unpredictable temperatures and can be hard to keep consistently cool, which may still affect herb quality. If you use these areas, monitor both temperature and humidity closely to reduce the risks.
If I accidentally dried some of my herbs too close to a sunny window and they look a bit faded, are they still safe to use for cooking, or should I toss them out?
If your herbs look faded from sun exposure, they’re still safe to use in cooking as long as they don’t smell musty or show signs of mold. Sunlight can cause color loss and reduce flavor, but it doesn’t make the herbs unsafe. Just check for any off smells or odd textures before using.
You mentioned using a hygrometer to track humidity, but what happens if the humidity spikes above 55% for a short period? Is it still safe to use the herbs, or should they be tossed?
If humidity in your drying room briefly rises above 55%, the herbs are usually still safe as long as it doesn’t stay high for too long. Just ensure the humidity returns to ideal levels quickly, and check the herbs for signs of mold or musty smell before use. If there’s no mold, they should be fine.