
Introduction: Crafting Artisan Cheese at Home
Imagine slicing into a wheel of creamy brie or tangy cheddar, knowing you personally nurtured it from curd to perfection. Home cheese making is an art, but the real magic happens during aging—a transformation driven by precise control over temperature, humidity, and airflow. This is where a home cheese aging cave comes in. Whether you’re a hobbyist yearning for authentic flavor or a dedicated artisan eager to experiment, building the right aging environment is crucial for producing safe, delicious cheeses. However, many home cheesemakers struggle with makeshift solutions that yield inconsistent results. Outfitting a proper cheese aging cave—whether a small converted fridge, a cool cellar, or a purpose-built chamber—requires specialized equipment and keen attention to detail. In this guide, we’ll break down every essential tool and piece of equipment you’ll need to set up, monitor, and maintain a home cheese cave that rivals professional fromageries. From temperature and humidity control to shelving, sanitation, and troubleshooting, you’ll find actionable advice to help you create cheeses you’ll be proud to share.
Understanding Cheese Aging: The Basics
Why Aging Matters
Aging, or affinage, is the process that develops a cheese’s texture and flavor. During this time, enzymes and microbes break down fats and proteins, transforming bland curds into complex wheels bursting with character. Each cheese style has its own aging requirements, but all benefit from a controlled environment.
Key Environmental Factors
- Temperature: Most cheeses age best between 50–55°F (10–13°C).
- Humidity: Relative humidity should be kept between 75–95%, depending on the cheese.
- Airflow: Adequate ventilation prevents mold overgrowth and uneven rinds.
- Sanitation: Cleanliness is vital to prevent spoilage and off-flavors.
Choosing Your Cheese Cave: Options for Home
1. Repurposed Mini Fridge or Wine Cooler
A small fridge or wine cooler is a popular choice for home cheese caves. Its compact size makes it easy to control temperature and humidity. However, modifications are often necessary to provide proper airflow and humidity.
2. Basement or Root Cellar
Some homes have naturally cool, humid spaces ideal for aging. However, baseline temperature and humidity may fluctuate, requiring supplemental equipment.
3. Purpose-Built Cabinets
Dedicated cheese aging cabinets offer the most control but require investment and space. These units often come equipped with built-in climate controls and shelving.
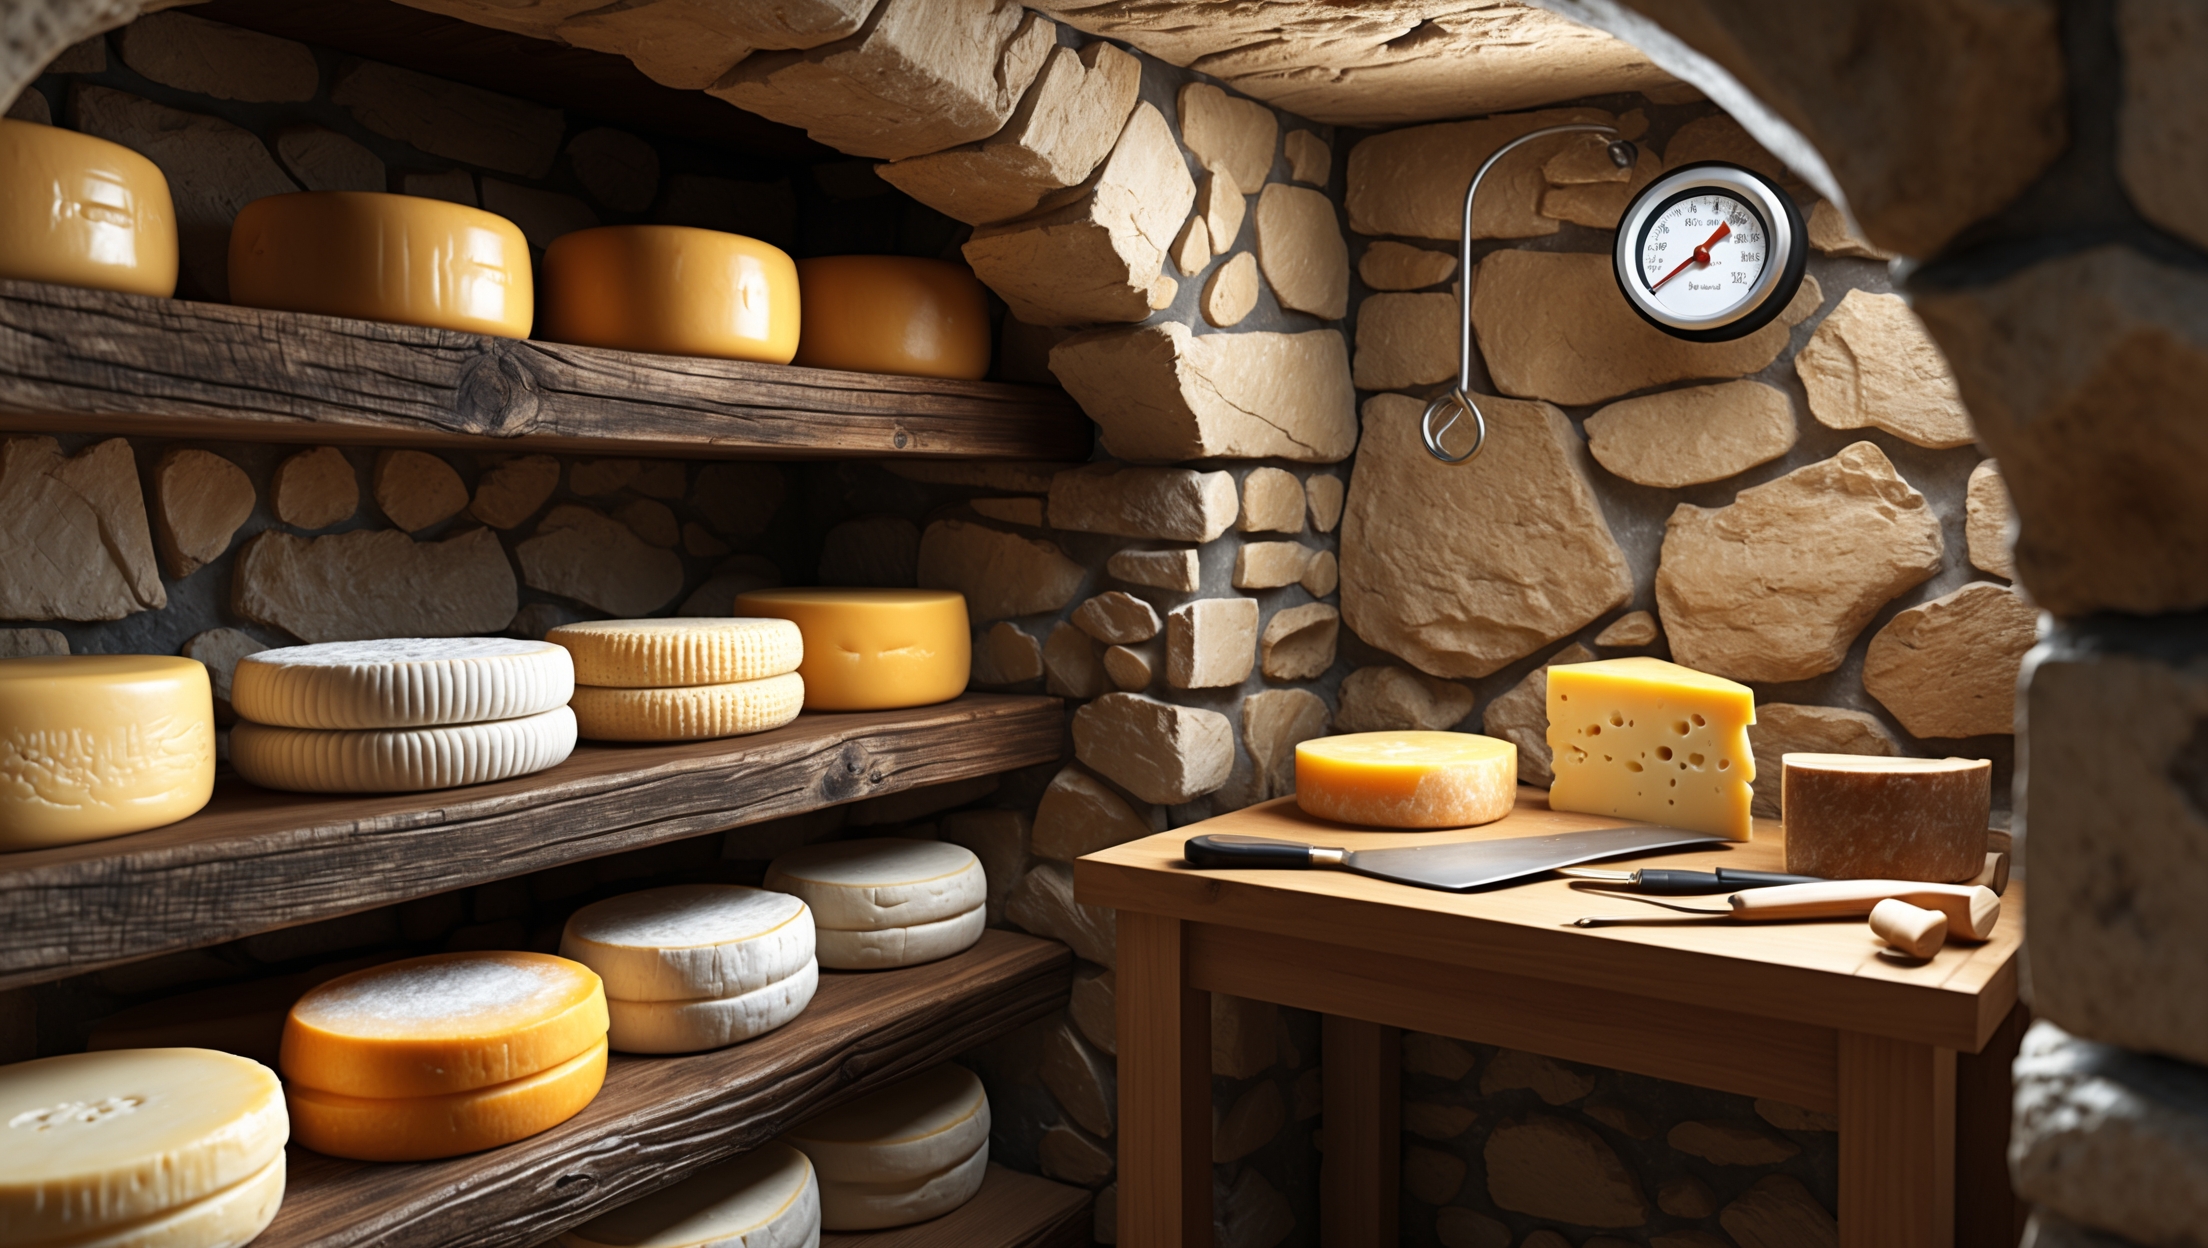
Essential Tools & Equipment for a Cheese Aging Cave
1. Climate Control Tools
- Thermostat Controller: A plug-in digital thermostat allows you to modify the cooling unit’s behavior, keeping temperatures within a narrow range. Models like the Inkbird ITC-308 are popular with home cheesemakers.
- Humidity Controller: Devices such as the Inkbird IHC-200 can automate humidifiers or dehumidifiers, helping you hit your target relative humidity.
- Digital Hygrometer/Thermometer: Essential for monitoring real-time conditions. Choose models with data logging so you can track trends and make adjustments.
- Humidifier: Ultrasonic or evaporative humidifiers add moisture. Select one sized appropriately for your space. Avoid warm-mist models, which can heat the cave.
- Dehumidifier: Useful if your space is too damp. Compact, low-output units are best for small caves.
2. Shelving & Storage
- Wire Racks: Stainless steel or coated wire racks maximize airflow around aging cheeses. Avoid wood unless you can sanitize it regularly.
- Plastic Draining Mats: Place under cheeses to allow air circulation and prevent cheeses from sticking to the shelf.
- Removable Trays or Bins: Useful for separating different cheese varieties or catching drips from washed-rind cheeses.
3. Airflow Management
- Small, Low-Speed Fan: Promotes even air distribution and prevents stagnant air pockets. Use sparingly to avoid drying out cheese rinds.
- Ventilation Ports: DIY caves may need drilled vents with adjustable covers to fine-tune airflow.
4. Sanitation & Cleaning
- Food-Safe Spray Bottle: For misting shelves and surfaces with a weak bleach solution or food-safe sanitizer between batches.
- Cheese Cave Brush: Dedicated brushes help remove unwanted mold from shelves and cheese rinds.
- Absorbent Towels: For wiping spills, condensation, or excessive moisture.
5. Monitoring & Recordkeeping
- Cheese Logbook: Track batch details, cave conditions, and flavor development for future reference.
- Labeling Supplies: Waterproof labels and pens keep your cheeses organized by date, type, and batch.
6. Maintenance Tools
- Replacement Filters: If using a fridge or wine cooler, regularly clean or replace air filters to prevent dust and odors.
- Spare Parts: Keep extra bulbs, fuses, or gaskets on hand for quick fixes.
Optional Upgrades for Serious Cheesemakers
- Data Logger: Continuous monitoring with downloadable data helps optimize your process.
- Ozone Generator: Small, food-safe ozone units can inhibit unwanted mold growth, but must be used cautiously and according to safety guidelines.
- pH Meter: Useful for serious affineurs wishing to track rind acidity during aging.
- UV Sanitizing Light: An advanced option for sterilizing shelves between batches—use with care.
Setting Up Your Cheese Aging Cave: Step-by-Step
1. Prepare the Space
Start with a thorough cleaning. Remove shelves and sanitize all surfaces. If using a fridge, disable any automatic defrost cycles, as these can dry out the cave. Install wire racks at appropriate intervals, ensuring at least two inches of space between cheeses for airflow.
2. Install Climate Controls
Plug the fridge or cooler into your thermostat controller. Place the temperature probe in the center of the cave, not near fans or doors. Set your target temperature and allow the unit to stabilize. Next, position your humidifier and dehumidifier, connecting them to their respective controllers if possible. Monitor for 24–48 hours, making adjustments until you consistently hit your targets.
3. Set Up Monitoring Devices
Mount your digital hygrometer/thermometer in an easy-to-read location. If using a data logger, set it up to record at regular intervals. Place extra sensors in different corners if your space is large or unevenly cooled.
4. Organize Shelving and Storage
Lay plastic draining mats on shelves. Arrange removable trays or bins for cheeses that release whey or require frequent washing. Label shelf positions for easy organization.
5. Test Airflow
Turn on your low-speed fan. Place a ribbon or piece of tissue near the shelves—gentle fluttering indicates good airflow. Adjust vent positions as needed to prevent drafts directly on cheeses.
6. Stock Sanitation Supplies
Keep your spray bottle, brushes, and towels within reach but outside the cave to avoid introducing contaminants.
7. Record Initial Conditions
Begin your first log entry, noting date, temperature, humidity, and any baseline observations.
Cheese-Specific Adjustments
Hard Cheeses (Cheddar, Gruyère, Parmesan)
- Aim for 50–55°F (10–13°C) and 80–85% humidity.
- Flip wheels weekly to encourage even aging.
- Brush or wipe rinds to remove unwanted mold.
Soft Cheeses (Brie, Camembert)
- Target 50–54°F (10–12°C) and 90–95% humidity.
- Monitor for surface mold growth and adjust airflow to prevent drying.
- Ripen on draining mats to avoid sticking.
Washed-Rind Cheeses (Taleggio, Limburger)
- Maintain 53–58°F (12–14°C) and 90–95% humidity.
- Wash rinds as needed and keep cheeses on trays to catch brine and whey.
- Increase airflow and cleaning frequency to control strong odors.
Troubleshooting Common Issues
1. Condensation or Dripping Water
This usually indicates a humidity or temperature imbalance. Reduce humidifier output, check door gaskets for leaks, and ensure the cave isn’t overfilled.
2. Mold Overgrowth
Some surface mold is normal, but fuzzy or colored molds may signal poor airflow or excessive humidity. Clean shelves more frequently, increase fan use briefly, and monitor sanitation.
3. Dry, Cracked Rinds
Low humidity or direct airflow causes drying. Mist the air, reduce fan speed, and increase humidity setpoint.
4. Ammonia Odors
Strong ammonia smells are common with bloomy or washed-rind cheeses but can indicate over-ripening or poor ventilation. Adjust air exchange and remove overripe cheeses promptly.
Maintaining Your Cheese Cave
Weekly Tasks
- Check and record temperature and humidity daily.
- Wipe down shelves and trays as needed.
- Inspect cheeses for unwanted mold; clean rinds if necessary.
- Flip hard cheeses and rotate soft cheeses for even aging.
Monthly Tasks
- Deep clean the cave with food-safe sanitizer.
- Check humidifier and dehumidifier reservoirs for buildup.
- Replace air or water filters as needed.
Seasonal Tasks
- Calibrate thermometer and hygrometer accuracy.
- Review and update your logbook with successful (and less successful) batches.
- Service fans and climate control devices.
Conclusion: Elevate Your Home Cheesemaking
Setting up a home cheese aging cave is more than a technical exercise—it’s an invitation to explore the world of artisan flavors and textures from your own kitchen. By equipping your cave with the right tools and equipment, you lay the foundation for consistent, safe, and delicious cheeses. Investing in quality climate controls, shelving, and monitoring devices pays off not only in the quality of your cheese but also in the confidence and creativity you bring to each batch. Remember, attention to detail and diligent recordkeeping help you learn from every wheel and wedge. Troubleshooting is part of the journey—don’t be discouraged by early mishaps. With each round, you’ll refine your process, deepen your understanding, and expand your palate.
Whether you’re dreaming of gooey camemberts, sharp cheddars, or pungent washed rinds, a well-outfitted cheese cave is your secret weapon. Take your time to select and arrange your equipment, maintain a regular cleaning and monitoring routine, and stay curious. Artisan cheese is a living food—let your cave become its nurturing home, and soon you’ll be savoring the complex, mouthwatering results of your own handiwork. Happy aging!
You mentioned that sanitation is crucial in preventing spoilage. Can you elaborate on recommended cleaning routines or products suitable for a home aging cave setup?
For a home cheese aging cave, it’s best to clean all surfaces and containers regularly with a mild, unscented detergent and warm water. Rinse thoroughly to remove any residue. Disinfect shelves and trays every few weeks using a food-safe sanitizer, like a diluted bleach solution (1 tablespoon of bleach per gallon of water), then air dry. Always wash hands before handling cheese, and avoid using harsh chemicals or scented cleaners that could affect your cheese.
If I set up a cheese cave using a repurposed mini fridge, how do I best control and monitor both temperature and humidity in such a small space to avoid ruining my cheese?
For a mini fridge cheese cave, use an external temperature controller to maintain stable temperatures—most cheeses prefer 50–55°F. For humidity, add a digital hygrometer to monitor levels, and use a small bowl of water or a damp sponge to increase humidity if needed. If it gets too humid, crack the door slightly or use desiccant packs. Check daily to keep conditions in the right range for your specific cheese.
I’m curious about the sanitation part—how often do you need to clean the inside of a home cheese cave, and what’s the safest way to do this without disrupting the cheese aging process?
For best results, clean the inside of your home cheese cave every 2 to 4 weeks or whenever you notice any mold or residue buildup. Use a solution of mild, unscented soap and warm water, or a diluted food-safe sanitizer. Wipe surfaces gently and avoid strong chemicals or bleach, as they can affect the cheese. Always remove your cheeses first, let surfaces dry completely, and return the cheeses only when everything is clean and odor-free.
Once the cheese is in the aging cave, how often should I be checking on it for mold or other issues, and what cleaning routine would you suggest to keep the environment sanitary without disrupting the aging process?
Check your cheeses at least once or twice a week for mold growth, moisture, and any off smells. For cleaning, wipe down shelves and surfaces with a mild vinegar solution every month, but avoid strong chemicals. Always dry surfaces thoroughly to prevent excess humidity. Handle cheeses with clean hands or gloves to minimize contamination.
Could you clarify how much daily maintenance or monitoring is involved to keep temperature and sanitation consistent in a home cheese cave? I want to understand what kind of time commitment is realistically needed.
Maintaining a home cheese cave usually takes about 10–15 minutes daily. You’ll need to check the temperature and humidity, adjust settings if necessary, and inspect for moisture or mold. Sanitation involves wiping down surfaces weekly and promptly addressing any spills or unusual growths. Monitoring regularly helps prevent issues and ensures your cheeses mature well.
You mentioned that cleanliness is crucial in a home cheese cave. What cleaning products or routines do you suggest to keep everything sanitary without affecting the cheese flavors?
To keep your cheese cave sanitary, use mild, unscented dish soap and warm water to clean shelves and surfaces. Rinse thoroughly to remove any soap residue. Avoid harsh chemicals or scented cleaners, as they can impact cheese flavor. Wipe surfaces weekly and ensure good airflow to discourage mold growth. Sterilize equipment like knives and brushes with hot water before use.
You mentioned sanitation as a key factor in home cheese aging. What’s the most effective cleaning routine for preventing unwanted mold or spoilage without using harsh chemicals that might affect the cheese?
Use hot water and fragrance-free, food-safe soap to clean all surfaces in your cheese cave, including racks and containers. Rinse thoroughly and air dry completely before returning cheese. Wipe down surfaces weekly and immediately clean up any spills. For stubborn spots, use a vinegar and water solution, which is effective yet gentle and won’t impact your cheese.
If someone is just starting out with home cheese aging on a budget, which pieces of equipment would you consider truly essential versus nice-to-have, given the recommendations in your guide?
For beginners on a budget, the truly essential equipment includes a dedicated mini-fridge or wine cooler for temperature control, a thermometer/hygrometer to monitor conditions, and basic aging mats or racks for airflow. Nice-to-haves would be a humidity controller, specialized cheese boxes, and additional shelving, but you can get started successfully without them.
For someone just starting out, is there a significant taste or texture difference between cheeses aged in a dedicated wine cooler versus a traditional cellar? I am weighing my options and curious if the investment in equipment really pays off.
A dedicated wine cooler provides more consistent temperature and humidity control than most traditional cellars, which can lead to more predictable aging and better texture in your cheeses. However, many beginners find good results with a well-managed cellar. If your cellar tends to fluctuate in temperature or humidity, a wine cooler may be worth the investment for more reliable results.
Could you explain how to adjust humidity levels if my converted fridge ends up being too dry? I’m curious what simple tools or hacks work best for home setups.
If your converted fridge is too dry, you can raise humidity by placing a shallow pan of water inside. For more control, use a small ultrasonic humidifier with a humidity controller. You can also add damp sponges or towels, but be sure to check and replace them regularly to prevent mold growth.
What specific tools would you recommend for monitoring both temperature and humidity in a converted mini fridge setup? Are there affordable options that offer reliable accuracy for beginners?
For a converted mini fridge cheese cave, a digital hygrometer-thermometer combo is essential. Look for models that display both temperature and humidity, such as the ThermoPro TP50 or Govee’s digital options. These are affordable, easy to use, and generally reliable for beginners. Avoid analog models for better accuracy.
When setting up a cheese aging cave, how important is ventilation compared to temperature and humidity control? My basement is cool but not very well ventilated—could that cause trouble with mold overgrowth or off flavors?
Ventilation plays an important role in a cheese aging cave, but temperature and humidity control are typically more critical for proper aging. Poor ventilation in your basement can lead to excessive mold growth and unwanted flavors, especially if moisture and air become stagnant. If possible, try to add some airflow, even a small fan or occasional airing out, to help prevent these issues while keeping your main focus on stable temperature and humidity.
Could you provide some guidance on how to keep the cheese cave clean and prevent unwanted molds, especially if I am aging different cheese types at the same time? I want to avoid cross-contamination but am not sure what sanitation routines are best.
To keep your cheese cave clean and prevent unwanted molds, regularly wipe down shelves and surfaces with a solution of mild vinegar and water. Clean or replace mats and containers often. Store different cheese types separately, ideally with a bit of space or even in separate boxes. Sanitize your hands and tools before handling cheese, and promptly remove any cheeses showing signs of contamination. Periodically air out the cave to reduce humidity buildup and mold spores.